By: CS2103-T14-1 Since: October 19 Licence: MIT
1. Introduction
Teacher’s Notebook is for teachers who prefer to make use of an application to keep track of the deliverables, tasks and students’ information. It is optimized for teachers who prefer to work with a Command Line Interface (CLI) while still having the benefits of a Graphical User Interface (GUI). If you are a teacher who wants to manage your students and your tasks efficiently, and can type fast, Teacher’s Notebook can get your work done much faster than traditional applications! Jump to Section 2, “Quick Start” to get started! Enjoy!
2. Quick Start
-
Ensure you have Java 11 or above installed in your Computer.
-
Download the latest teachersnotebook.jar here.
-
Copy the file to the folder you want to use as the home folder for your Teacher’s Notebook.
-
Double-click the file to start the app. The GUI should appear in a few seconds.
-
Type in the commands and press enter to execute them. Refer to Section 3: Features for more details on the commands.
-
Refer to Section 3, “Features” for details of each command.
3. Features
Command Format
* Words in UPPER_CASE are the parameters supplied by the user e.g. in addclass c/CLASS, CLASS is a parameter which can be used as addclass c/4C.
* Items in square brackets are optional e.g. n/NAME [m/MEDICAL_CONDITIONS] can be used as n/John Doe m/Sinus or n/John Doe.
* Items with … after them can be used multiple times including zero times e.g. [t/TAGS]… can be used as (i.e. 0 times), t/Math REP, t/MATH REP t/Bully etc.
* Parameters can be in any order e.g. if the command specifies n/NAME a/ADDRESS, a/ADDRESS, n/NAME is also acceptable
3.1. Classrooms
The user can view his or her classrooms in the middle panel of the GUI of Teacher’s Notebook as shown below.

The first classroom in the panel is selected by default.
| Classroom names are case sensitive. |
3.1.1. Adding Classroom: addclass
Adds a new classroom to the list of existing classroom.
Format: addclass c/CLASS_NAME
Examples:
-
addclass c/4E7 -
addclass c/3E8
| The name of the new classroom must not be empty, and it must be different from all current classroom names. |
3.1.2. Deleting Classroom: deleteclass
Allows a user to delete the selected classroom.
Format: deleteclass c/CLASS_NAME
Examples:
-
deleteclass c/4E7 -
deleteclass c/3E8
| Classroom must be in the current list of classrooms, and CLASS_NAME cannot be empty. |
3.1.3. Setting Classroom: setclass
Allows a user to select a classroom as the selected classroom. Student and Assignment functions will act on the selected classroom. The image below illustrates the change in the middle GUI panel when setclass is called.
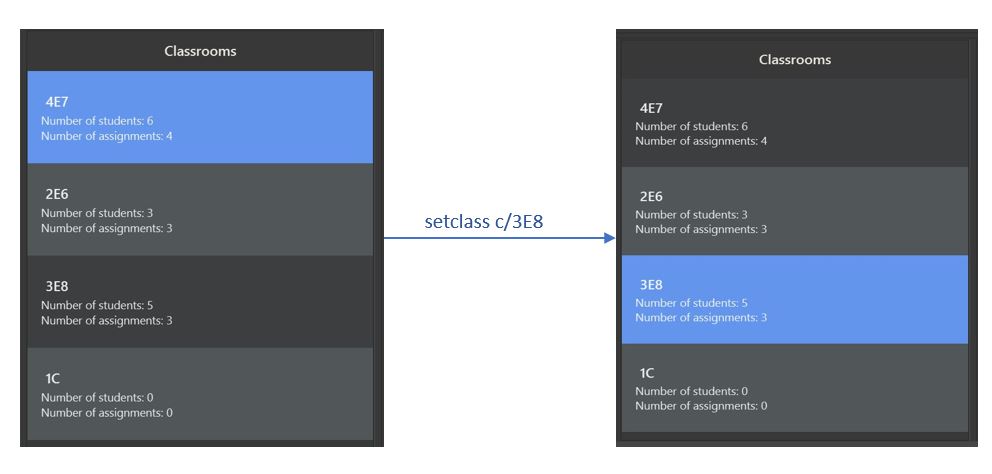
Format: setclass c/CLASS_NAME
Examples:
-
setclass c/4E7 -
setclass c/3E8
| Classroom must be in the current list of classrooms, and classroom name cannot be empty. |
3.2. Lessons
The user can view his or her lessons on the left panel of the GUI of the Teacher’s Notebook.
There are several fields in each lesson as shown below:
-
LessonName - Prefix: l/
-
LessonNames should be alphanumerical, and cannot be empty.
-
-
StartTime - Prefix: st/
-
StartTime should be in the format dd/mm/yyyy hhmm e.g. 12/01/2020 1200
-
-
EndTime - Prefix: et/
-
EndTime should be in the format dd/mm/yyyy hhmm e.g. 12/01/2020 1300
-
-
repeat - Prefix: r/
-
Day - Prefix: day/
-
Day should be an integer between 1-7.
-
3.2.1. Adding: addlesson
Adds a lesson to the lesson list of the notebook.
Feature to repeat lessons will be implemented in v2.0
Format: addlesson l/LESSON st/START_TIME et/ET_TIME:dd/MM/yy HHmm
Examples:
-
addlesson l/Math 4E7 st/12/01/2020 1200 et/12/01/2020 1300 -
addlesson l/English 3E8 st/06/01/2020 1200 et/06/01/2020 1300
| Once a lesson is added, a reminder will be automatically scheduled and an alert box will pop up when current time matches the time of the lesson. |
3.2.2. Editing: editlesson
Edits a lesson at the specific index in the day list of reminder panel.
Day index represents day in week, e.g. Monday: 1, Tuesday: 2
Format: editlesson LESSON_INDEX day/DAY_INDEX [l/LESSON_NAME] [st/START_TIME] [et/END_TIME]
Examples:
-
editlesson 1 day/3 l/English 4E2 -
editlesson 2 day/4 st/05/01/2020 1200 et/05/01/2020 1300
| The index and day index provided must be valid and at least one field must be edited. |
3.2.3. Deleting: deletelesson
Deletes a lesson at the specified index in the day list of reminder panel.
Day index represents day in week, e.g. Monday: 1, Tuesday: 2
Format: deletelesson LESSON_INDEX day/DAY_INDEX
Examples:
-
deletelesson 1 day/2 -
deletelesson 3 day/4
| The index and day index provided must be valid and at least one field must be edited. |
3.2.4. Finding: findlesson
Finds lessons which match the given keyword.
Format: findlesson KEYWORD
Examples:
-
findlesson Math -
findlesson 12:00
3.3. Students
Students are contained within each classroom. There are several fields in each student as shown below:
-
Name - Prefix: n/
-
Names must be alphanumerical, and cannot be empty.
-
-
Email - Prefix: e/
-
Emails must be in the format alphanumeric@example.com e.g. amanda@example.com, ilovebubbletea@gmail.com
-
-
Phone - Prefix: p/
-
Phone numbers must be at least 3 digits, and must only contain digits.
-
-
Address - Prefix: a/
-
Address must be alphanumerical, and cannot be empty.
-
-
Parent Phone - Prefix: pp/
-
Parent phone numbers must be at least 3 digits, and must only contain digits.
-
-
Medical Conditions - Prefix: m/
-
Medical conditions must be alphanumerical. This is an optional field.
-
-
Tags - Prefix: t/
-
Tags must be alphanumerical. This is an optional field that can be used multiple times.
-
-
DisplayPicture - Prefix: none
-
Display pictures must be in PNG file format. A default display picture is set for each student.
-
3.3.1. Adding Student: addstudent
Adds a student to the student list of the current class.
Format: addstudent n/NAME e/EMAIL p/PHONE a/ADDRESS pp/PARENT_PHONE [m/MEDICAL_CONDITIONS]… [t/TAG]…
Examples:
-
addstudent n/John Doe e/johndoe@gmail.com p/81930042 a/Jurong East Avenue 3 Blk 639 #12-02 pp/84295512 m/Sinus -
addstudent n/Jane Doe e/janedoe@hotmail.com p/91823051 a/Tampinese Avenue 5 Blk 772 #02-84 pp/99811241 t/PE Rep t/Naughty
3.3.2. Editing Student: editstudent
Edits a student at the specified index in the student list of the current class.
Format: editstudent STUDENT_INDEX [n/NAME] [p/PHONE] [e/EMAIL] [a/ADDRESS] [pp/PARENT_PHONE] [m/MEDICAL_CONDITIONS], [t/TAG]…
Examples:
-
editstudent 2 p/98510293 e/jonathan@example.com -
editstudent 4 n/Xavier Lim
| The index provided must be valid (is an integer and exists in the student list) and at least one field must be edited. If the list has been filtered through the Finding Student command, the index provided corresponds to the index on the filtered list. |
3.3.3. Deleting Student: deletestudent
Deletes a student at the specified index in the student list of the current class.
Format: deletestudent STUDENT_INDEX
Example:
-
deletestudent 5
| The index provided must be valid (is an integer and exists in the student list) If the list has been filtered through the Finding Student command, the index provided corresponds to the index on the filtered list. |
3.3.4. Listing Students: liststudents
Lists all the students in the current classroom.
Format: liststudents
3.3.5. Finding Student: findstudent
Find students whose name matches a given keyword in the current classroom.
Format: findstudent STUDENT_NAME
Examples:
-
findstudent John Doe -
findstudent Jane Doe
3.3.6. Uploading: upload
Allows a user to upload a PNG/JPG file to set the display picture of the student at the specified index in the student list of the current class.
Upon entering the command, a window will popup as shown below:

And the user will be prompted to select a PNG/JPG file from their computer to set as the new display picture of the student.
The user may cancel the upload operation by clicking on cancel in the window that pops up.
Format: upload STUDENT_INDEX
Example:
-
upload 3
| The index provided must be valid (is an integer and exists in the student list). If the list has been filtered through the Finding Student command, the index provided corresponds to the index on the filtered list. The directory of the image uploaded is assumed to not change. If the image is moved or deleted after it is set as the display picture, the display picture will be empty when the user starts up Teacher’s Notebook. |
3.3.7. Resetting display picture
Resets the display picture of the student to the default.
Format: resetdisplaypic
Example:
-
resetdisplaypic
3.4. Assignments
Assignments are contained within each class. There are two fields in each assignment as shown below:
-
Name - Prefix: as/
-
Names must be alphanumerical, and cannot be empty.
-
-
Deadline - Prefix: d/
-
Deadlines must be in the format dd/MM/yyyy HHmm, and later than the current date and time e.g. 01/12/19 0000, 25/12/19 2359
-
3.4.1. Adding Assignment: addassignment
Adds an assignment to the assignment list of the current class.
Format: addassignment as/ASSIGNMENT d/DEADLINE:dd/MM/yyyy HHmm
Examples:
-
addassignment as/Math Test d/29/11/2020 1400 -
addassignment as/English Test 2 d/30/11/2020 1400
3.4.2. Editing Assignment: editassignment
Edits an assignment at the specified index in the student list of the current class.
Format: editassignment ASSIGNMENT_INDEX [as/ASSIGNMENT_NAME] [d/ASSIGNMENT_DEADLINE]
Examples:
-
editassignment 1 as/English Test d/29/11/2020 1400 -
editassignment 1 as/Math Test d/29/11/2020 1600
| The index provided must be valid (is an integer and exists in the assignment list) and at least one field must be edited. If the list has been filtered through the Finding Assignment command, the index provided corresponds to the index on the filtered list. |
3.4.3. Deleting: deleteassignment
Deletes an assignment at the specified index in the assignment list of the current class.
Format: deleteassignment ASSIGNMENT_INDEX
Example:
-
deleteassignment 1
| The index provided must be valid (is an integer and exists in the assignment list). If the list has been filtered through the Finding Assignment command, the index provided corresponds to the index on the filtered list. |
3.4.4. Listing Assignments: listassignments
Lists all the assignments in the assignment list
Format: listassignments
3.4.5. Finding Assignment: findstudent
Find assignments whose name matches a given keyword in the current classroom.
Format: findassignment ASSIGNMENT_NAME
Examples:
-
findassignment Math -
findassignment Test
| The keyword is not case-sensitive, so as to provide ease of use for the user. |
3.4.6. Updating Grades: grades
Updates the grades of the assignment identified by the index number of the assignment list of the current classroom
This can be done for all students simultaneously or for a particular student.
Format (All Students): as/ASSIGNMENT_INDEX g/GRADE GRADE … GRADE
Format (One Student): as/ASSIGNMENT_INDEX s/STUDENT_INDEX g/GRADE
Examples:
-
grades as/1 g/10 20 30 40 -
grades as/1 s/1 g/10
|
Grades must be an integer from 0 to 100, and ASSIGNMENT_INDEX must be valid (check above for definition of valid ASSIGNMENT_INDEX). For the All Students variant, the number of grades input must be equal to the total number of students in the classroom. For the One Student variant, the STUDENT_INDEX must be valid. The default grades of all students is "Not Submitted". Once there are no longer any "Not Submitted" grades belonging to the assignment, the assignment is marked as completed When a student is added, each uncompleted assignment will include the new student with the grade "Not Submitted" When a student is added, each completed assignment will include the new student with the grade "Late to the party". This distinguishes the whether the student was added before or after the assignment was marked (completed) by the user, and it would be unfair to expect a new student to submit work that was assigned before he/she joined the classroom. |
3.4.7. Get Grades: getgrades
Gets all the grades of the chosen student index in the current classroom.
The command result will show all the grades of the specified student.
Format: getgrades STUDENT_INDEX
Example:
-
getgrades 1
3.4.8. Get Unsubmitted Assignments: getunsubmitted
Gets all the unsubmitted assignments in the current classroom.
The command result will unsubmitted assignments with the corresponding student names.
Format: getunsubmitted
3.5. User-Friendly Features
The features here do not necessarily contribute directly to a teacher’s everyday job, but improve the usability
of Teacher’s Notebook and make using the application a more forgiving, painless and seamless experience.
3.5.1. Autocomplete
Allows a user to toggle through suggestions that guess at what command the user wants to type in.
Upon typing any letters that resemble commands, a popup menu will appear as shown below:
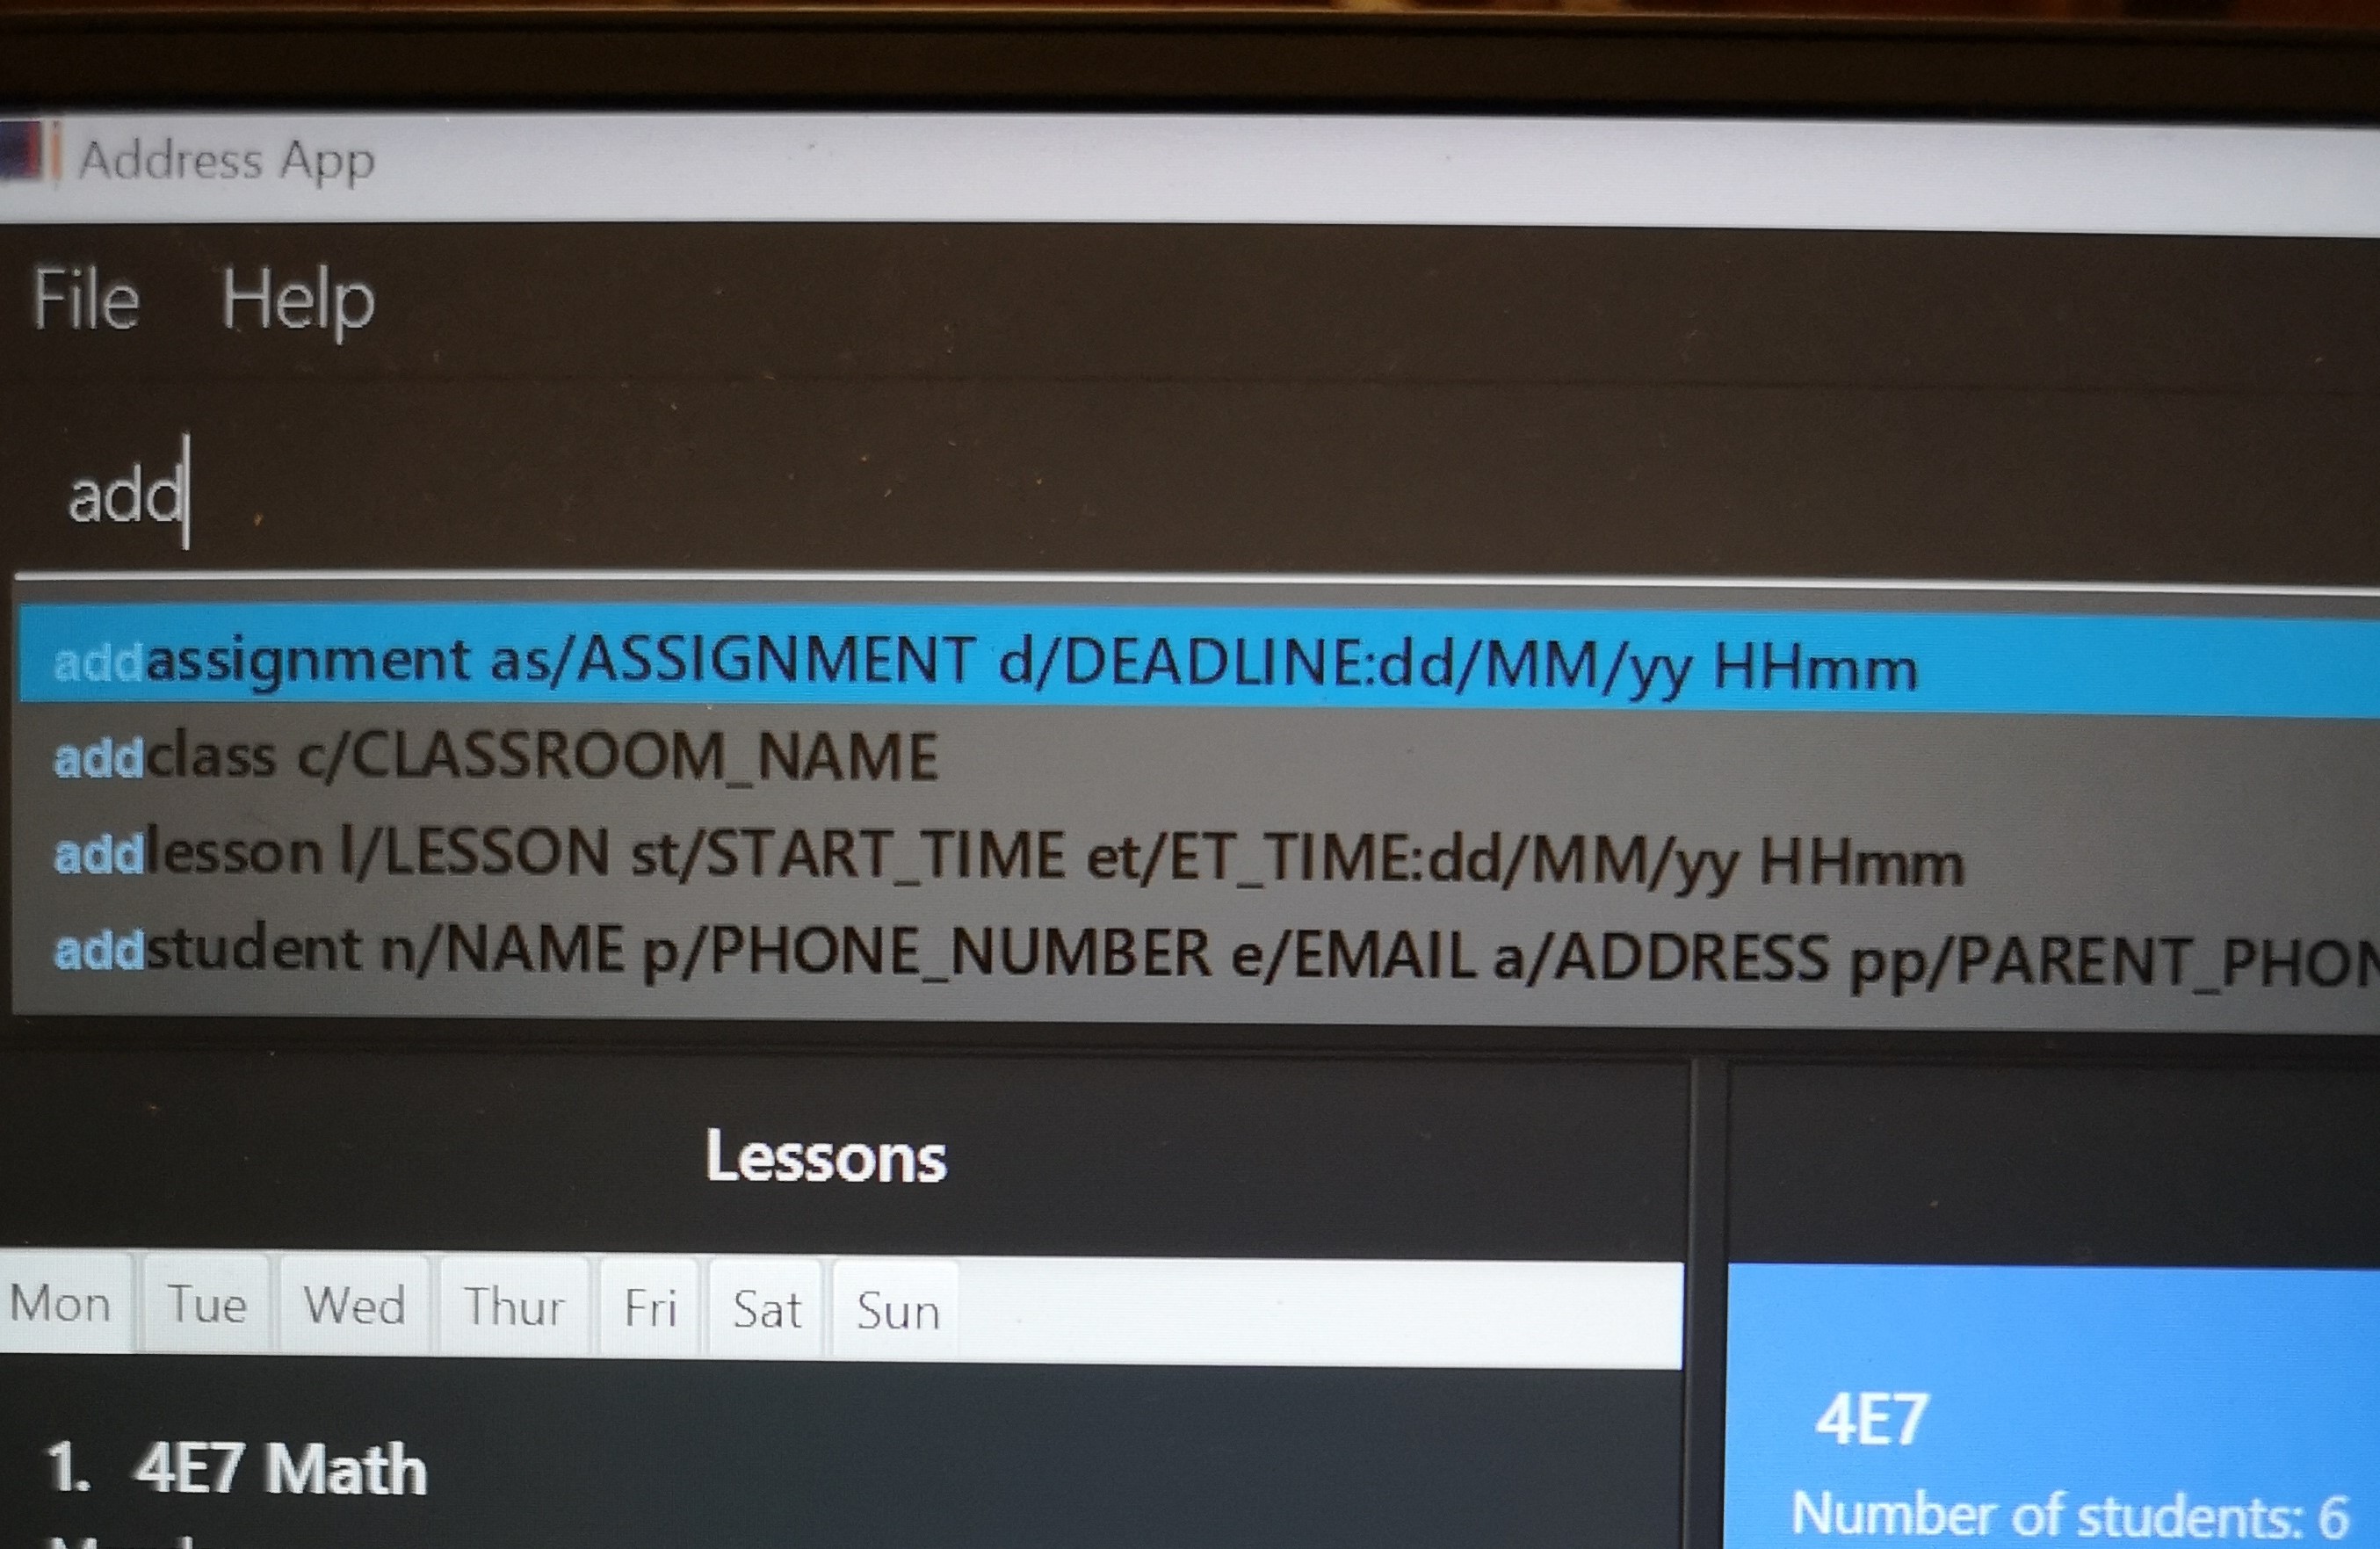
Selecting any of these suggestions results sets the text of the text field to the suggestion.
Usage:
SHIFT + Arrow DOWN and SHIFT + Arrow UP Keys to toggle between autocomplete suggestions
CTRL Key to choose the first autocomplete suggestion, or turn AutoComplete on if it is turned off.
ESC Key to close the autocomplete suggestions and turn off AutoComplete.
| To facilitate the user learning the long and possibly tedious commands, the AutoComplete popup menu does not hide when a user’s input greater than 6 characters does not match any command. This is why even if the input matches the suggestion, the matching part of the suggestion is not highlighted past 6 characters. 6 characters is an arbitrary value and will be improved upon in future releases, and with user feedback. |
3.5.2. History
Allows a user to toggle through their previously entered commands, regardless of whether the command was successful.
It is likely that autocomplete and history will clash, as both use the arrow keys.
We recommend that you turn the autocomplete feature off (ESC key) before using the
history feature.
|
Usage:
Arrow UP and DOWN Key to toggle through previous commands
3.5.3. Undo/Redo: Undo/Redo
Restores the database to the state before the previous undoable command was executed.
Undoable commands are commands that modify the database’s content: add, delete
edit, clear, upload.
|
Undo/redo cannot, however, undo actions made during previous activation of Teacher’s Notebook.
This is to say, once the application is closed, all actions done cannot be undone.
Format: undo or redo
Examples:
-
deletestudent 1+undo(reverses thedelete 1command)
redo(applies the delete command again) -
liststudents+undo(Error message displayed as no changes made to database)
3.5.5. Clear
Clears all data from the notebook. If triggered erroneously, the undo command can be used to reclaim all data.
Format: clear
4. Additional Features Coming in V2.0
4.1. Reminders for Assignments [coming in v2.0]
Assignments can be added to the reminders for the notebook, where users will be alerted when the deadline is up for assignments.
Once the deadline is over, the assignments will be removed from the reminder panel, but will remain in the assignment list for future reference.
This will give teachers a clearer idea of what they need to do in the reminder panel beyond just lessons.
4.2. Statistics for Assignments [coming in v2.0]
Calculates the statistics for the chosen assignment for each classroom - Average, Median, 25th / 75th percentile etc.
This will give teachers a clearer idea of how each classroom as a whole is doing.
Format: getstats ASSIGNMENT_INDEX
5. FAQ
-
How do I transfer my data from the current notebook to another computer?
Copy the teachernotebook.json file from your current computer, and paste it in a /data folder in your other computer’s directory where teachernotebook.jar is at.
6. Command Summary
-
Add Class:
addclass c/CLASS_NAME
e.g.addclass c/4E3 -
Delete Class:
deleteclass c/CLASS_NAME
e.g.deleteclass c/4E3 -
Set Class:
setclass c/CLASS_NAME
e.g.setclass c/4C3 -
Add Lesson:
l/LESSON st/START_TIME et/ET_TIME:dd/MM/yy HHmm
e.g.addlesson l/Math 4E7 st/12/01/2020 1200 et/12/01/2020 1300 -
Edit Lesson:
editlesson LESSON_INDEX day/DAY_INDEX [l/LESSON_NAME] [st/START_TIME] [et/END_TIME]
e.geditlesson 2 day/4 st/05/01/2020 1200 et/05/01/2020 1300 -
Delete Lesson:
deletelesson LESSON_INDEX day/DAY_INDEX
e.g.deletelesson 1 day/2 -
Find Lesson:
findlesson KEYWORD
e.g.findlesson Math -
Add Student:
addstudent n/NAME e/EMAIL p/PHONE a/ADDRESS pp/PARENT_PHONE [m/MEDICAL_CONDITIONS]… [t/TAG]…
e.g.addstudent n/John Doe e/johndoe@gmail.com p/81930042 a/Jurong East Avenue 3 Blk 639 #12-02 pp/84295512 m/Sinus -
Edit Student:
editstudent STUDENT_INDEX [n/NAME] [p/PHONE] [e/EMAIL] [a/ADDRESS] [pp/PARENT_PHONE] [m/MEDICAL_CONDITIONS], [t/TAG]…
e.g.editstudent 2 p/98510293 -
Delete Student:
deletestudent STUDENT_INDEX
e.g.deletestudent 3 -
Upload:
upload STUDENT_INDEX
e.g.upload 2 -
List Students:
liststudents -
Find Student:
findstudent STUDENT_NAME
e.g.findstudent John Doe -
Reset Display Picture:
resetdisplaypic -
Add Assignment:
addassignment as/ASSIGNMENT d/DEADLINE:dd/MM/yyyy HHmm
e.g.addassignment as/Math Test d/29/11/2020 1400 -
Edit Assignment:
editassignment ASSIGNMENT_INDEX [as/ASSIGNMENT_NAME] [d/ASSIGNMENT_DEADLINE]
e.g.editassignment 1 as/English Test d/29/11/2020 1400 -
Delete Assignment:
deleteassignment ASSIGNMENT_INDEX
e.g.deleteassignment 1 -
List Assignments:
listassignments -
Find Assignment:
findassignment ASSIGNMENT_NAME
e.g.findassignment Math -
Update Grades:
Format (All Students):as/ASSIGNMENT_INDEX g/GRADE GRADE … GRADE
Format (One Student):as/ASSIGNMENT_INDEX s/STUDENT_INDEX g/GRADE
e.g.grades as/1 g/10 20 30 40
e.g.grades as/1 s/1 g/10 -
Get Grades:
getgrades STUDENT_INDEX
e.g.getgrades 1 -
Get Unsubmitted Assignments:
getunsubmitted -
Undo Action:
undo -
Redo Action:
redo -
Clear Data:
clear -
Bring up help window:
help -
Exit the application:
exit