By: CS2103-T14-1 Since: October 19 Licence: MIT
1. Setting up
Refer to the guide here.
2. Design
2.1. Architecture
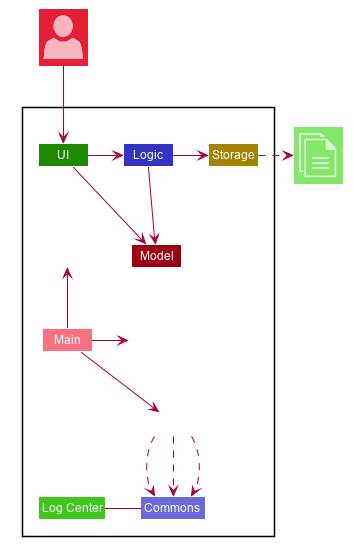
The Architecture Diagram given above explains the high-level design of the App. Given below is a quick overview of each component.
The .puml files used to create diagrams in this document can be found in the diagrams folder.
Refer to the Using PlantUML guide to learn how to create and edit diagrams.
|
-
At app launch: Initializes the components in the correct sequence, and connects them up with each other.
-
At shut down: Shuts down the components and invokes cleanup method where necessary.
Commons represents a collection of classes used by multiple other components.
The following class plays an important role at the architecture level:
-
LogsCenter: Used by many classes to write log messages to the App’s log file.
The rest of the App consists of four components.
Each of the four components
-
Defines its API in an
interfacewith the same name as the Component. -
Exposes its functionality using a
{Component Name}Managerclass.
For example, the Logic component (see the class diagram given below) defines it’s API in the Logic.java interface and exposes its functionality using the LogicManager.java class.
How the architecture components interact with each other
The Sequence Diagram below shows how the components interact with each other for the scenario where the user issues the command delete 1.
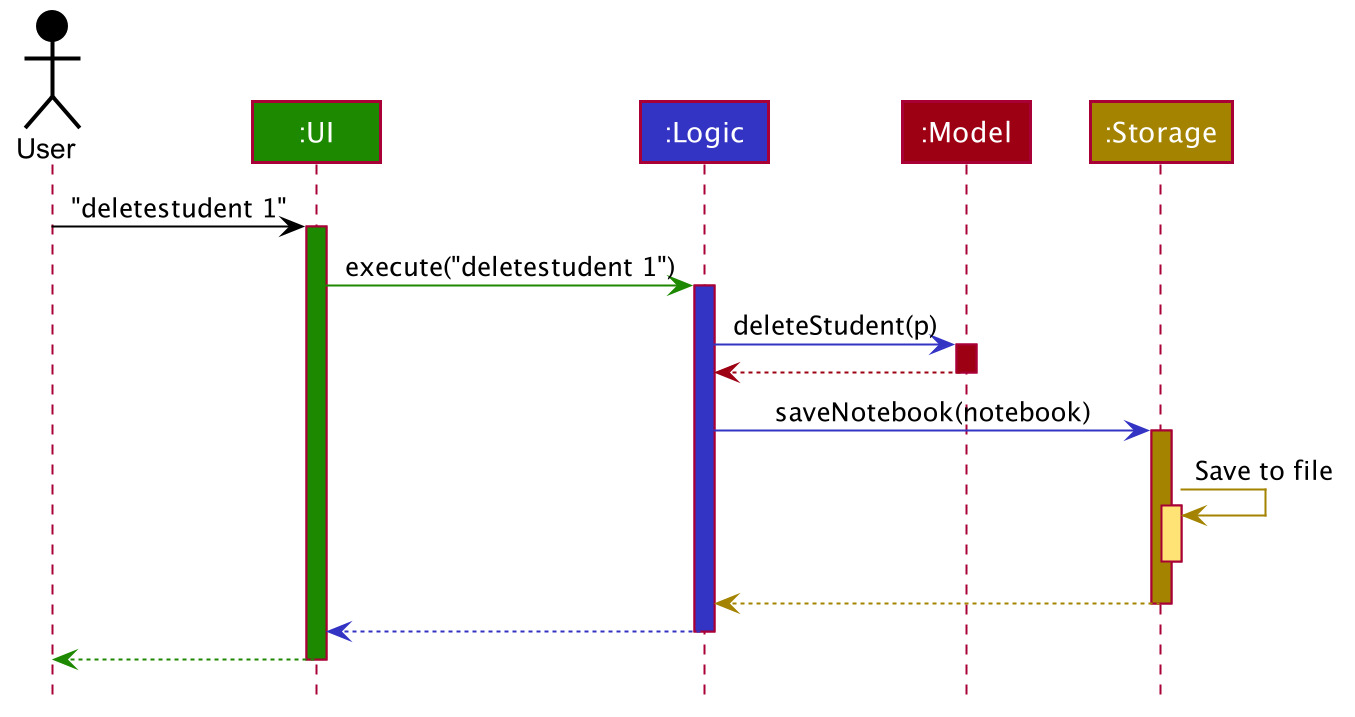
deletestudent 1 commandThe sections below give more details of each component.
2.2. UI component
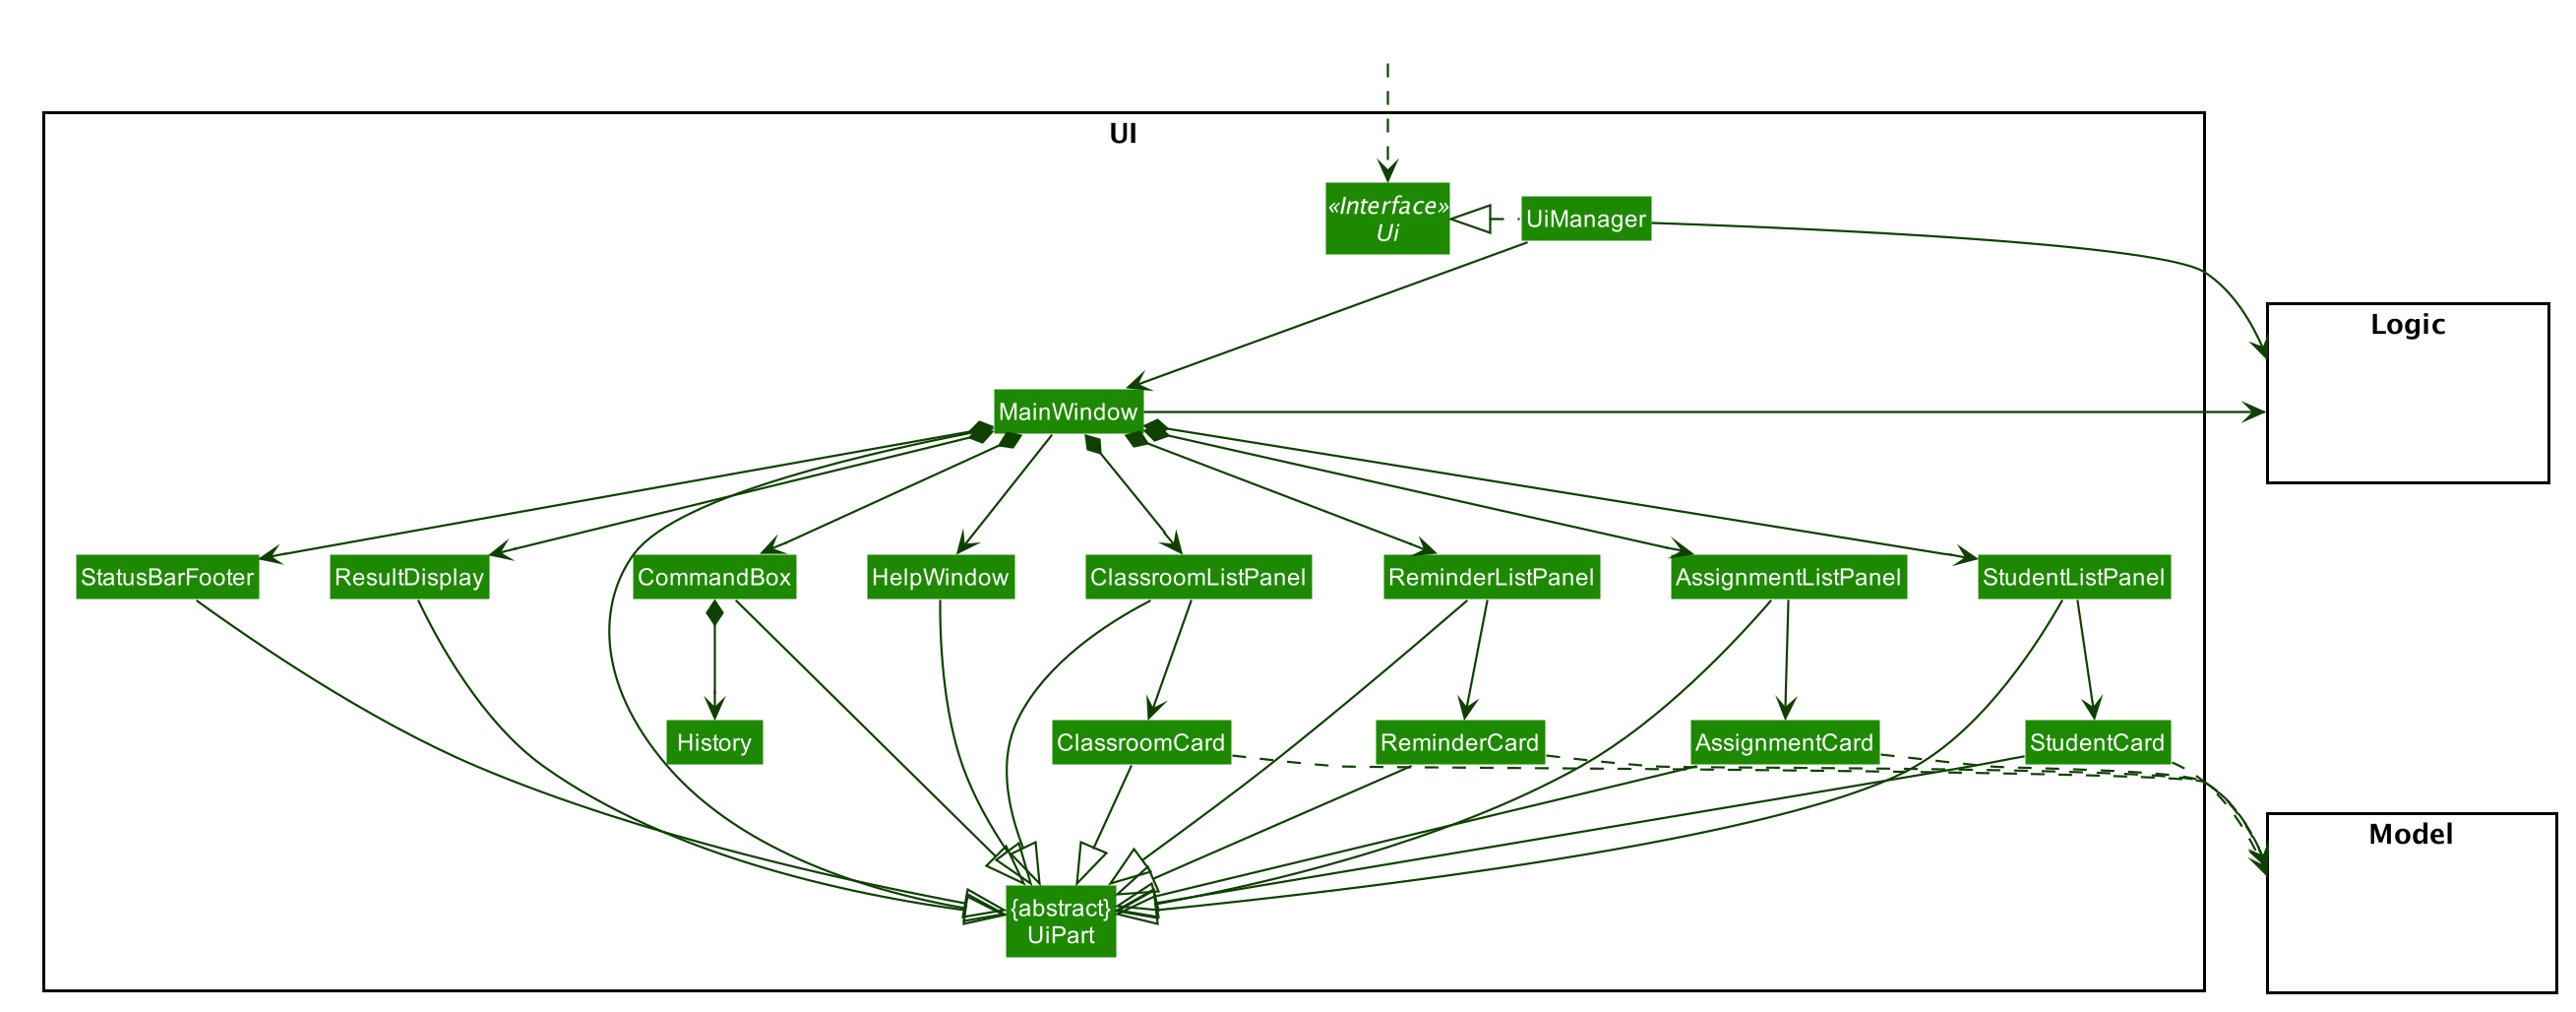
API : Ui.java
The UI consists of a MainWindow that is made up of parts e.g.CommandBox, ResultDisplay, StudentListPanel, AssignmentListPanel, StatusBarFooter etc. All these, including the MainWindow, inherit from the abstract UiPart class.
The UI component uses JavaFx UI framework. The layout of these UI parts are defined in matching .fxml files that are in the src/main/resources/view folder. For example, the layout of the MainWindow is specified in MainWindow.fxml
The UI component,
-
Executes user commands using the
Logiccomponent. -
Listens for changes to
Modeldata so that the UI can be updated with the modified data. -
Handles the History feature
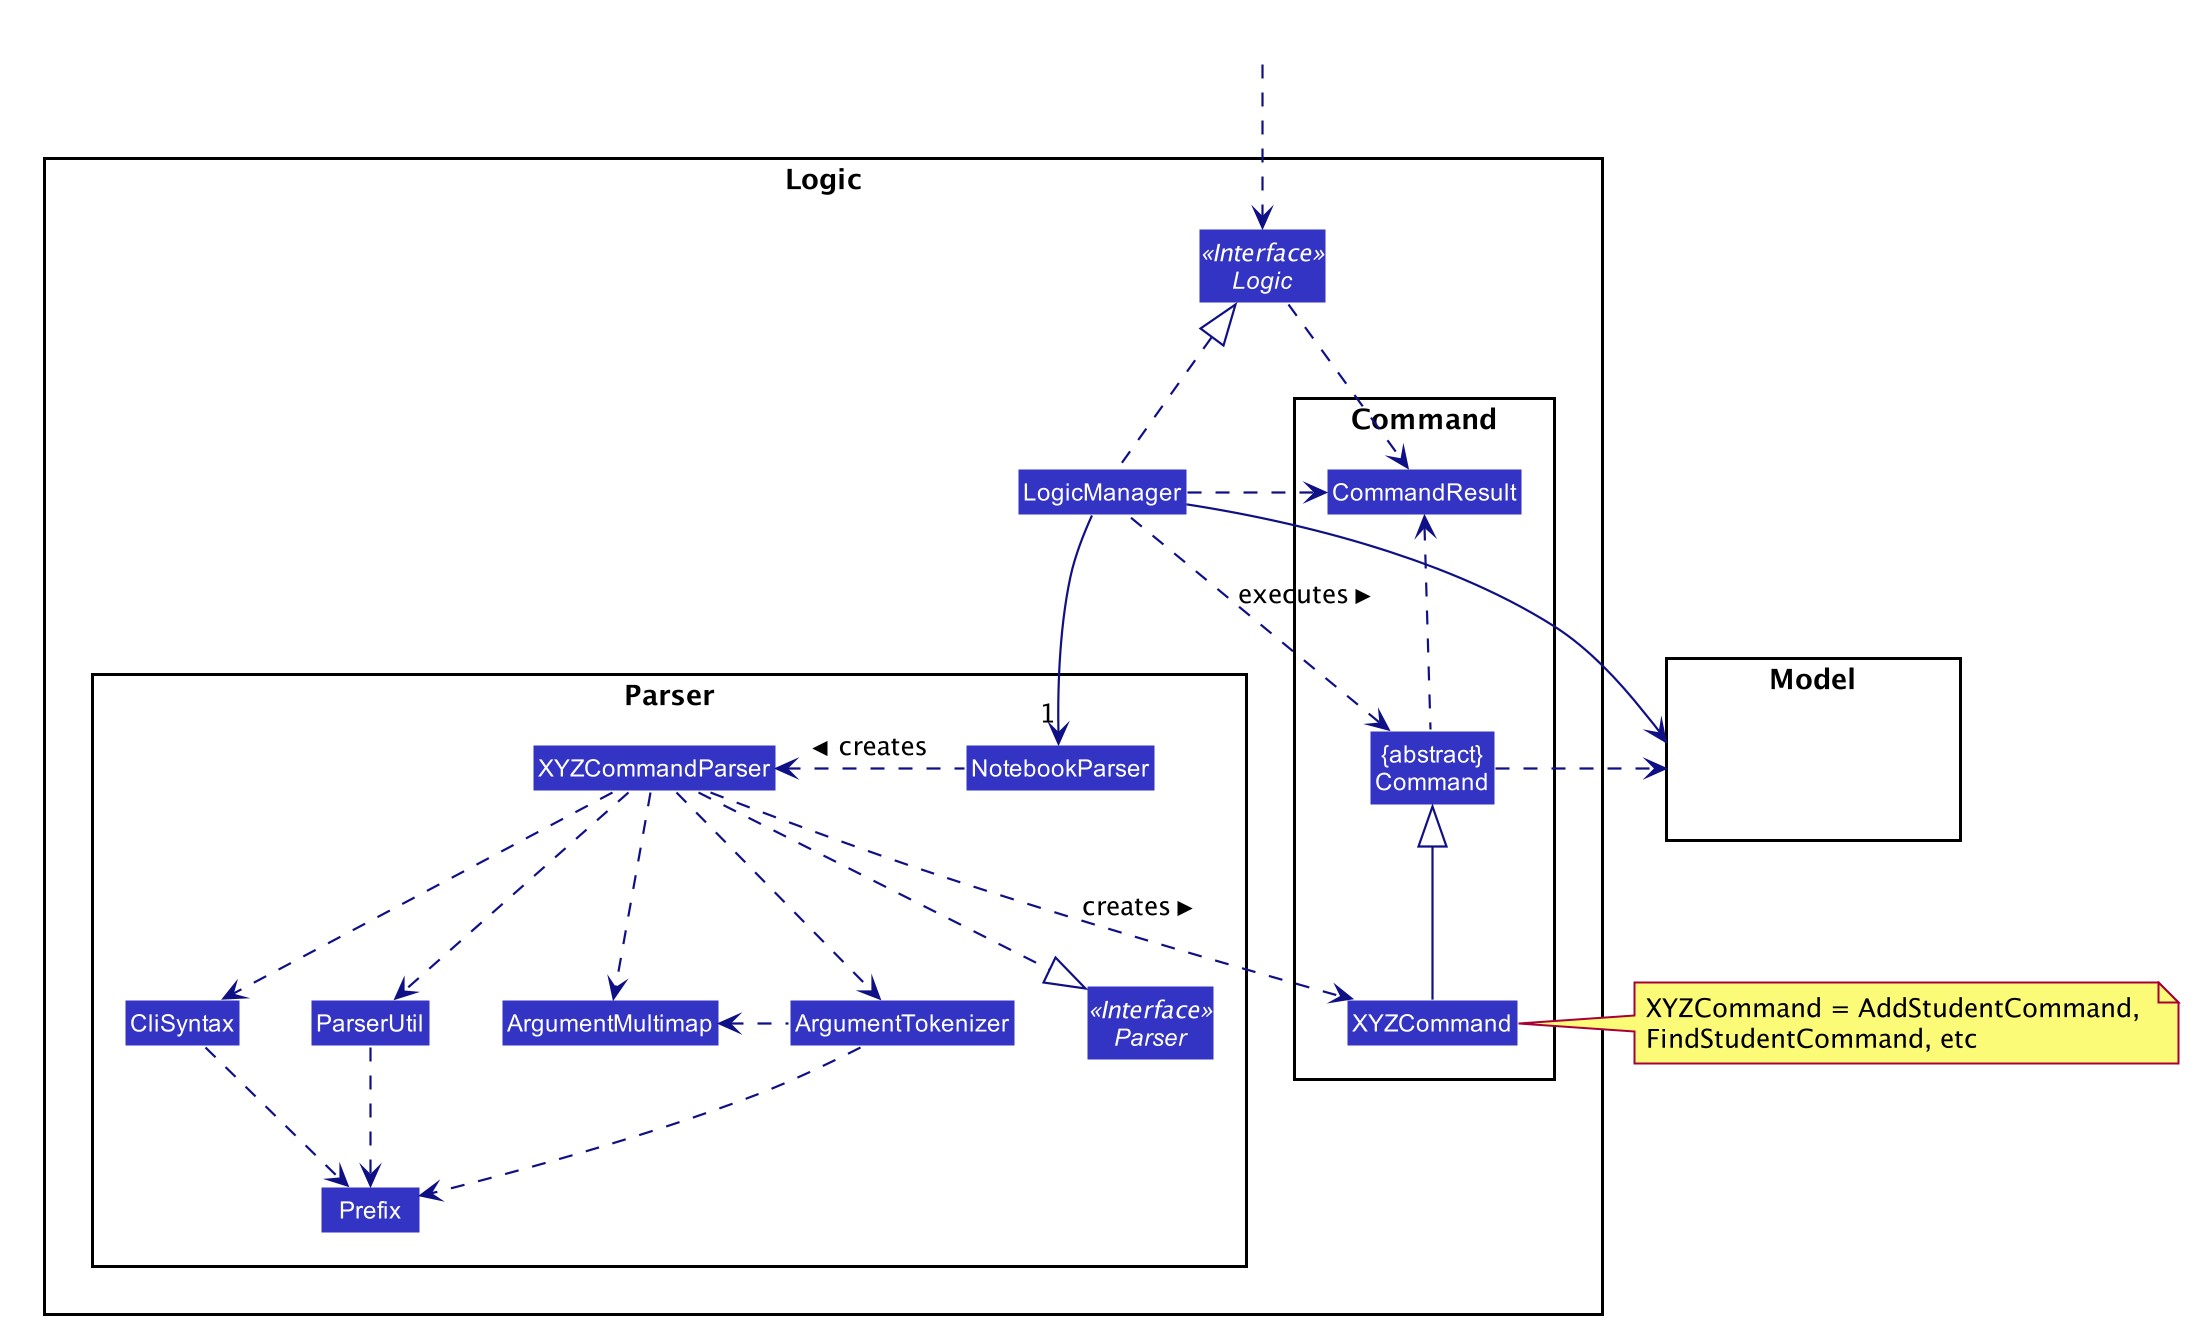
2.3. Logic component
API :
Logic.java
-
Logicuses theNotebookParserclass to parse the user command. -
This results in a
Commandobject which is executed by theLogicManager. -
The command execution can affect the
Model(e.g. adding a student). -
The result of the command execution is encapsulated as a
CommandResultobject which is passed back to theUi. -
In addition, the
CommandResultobject can also instruct theUito perform certain actions, such as displaying help to the user.
Given below is the Sequence Diagram for interactions within the Logic component for the execute("deletestudent 1") API call.
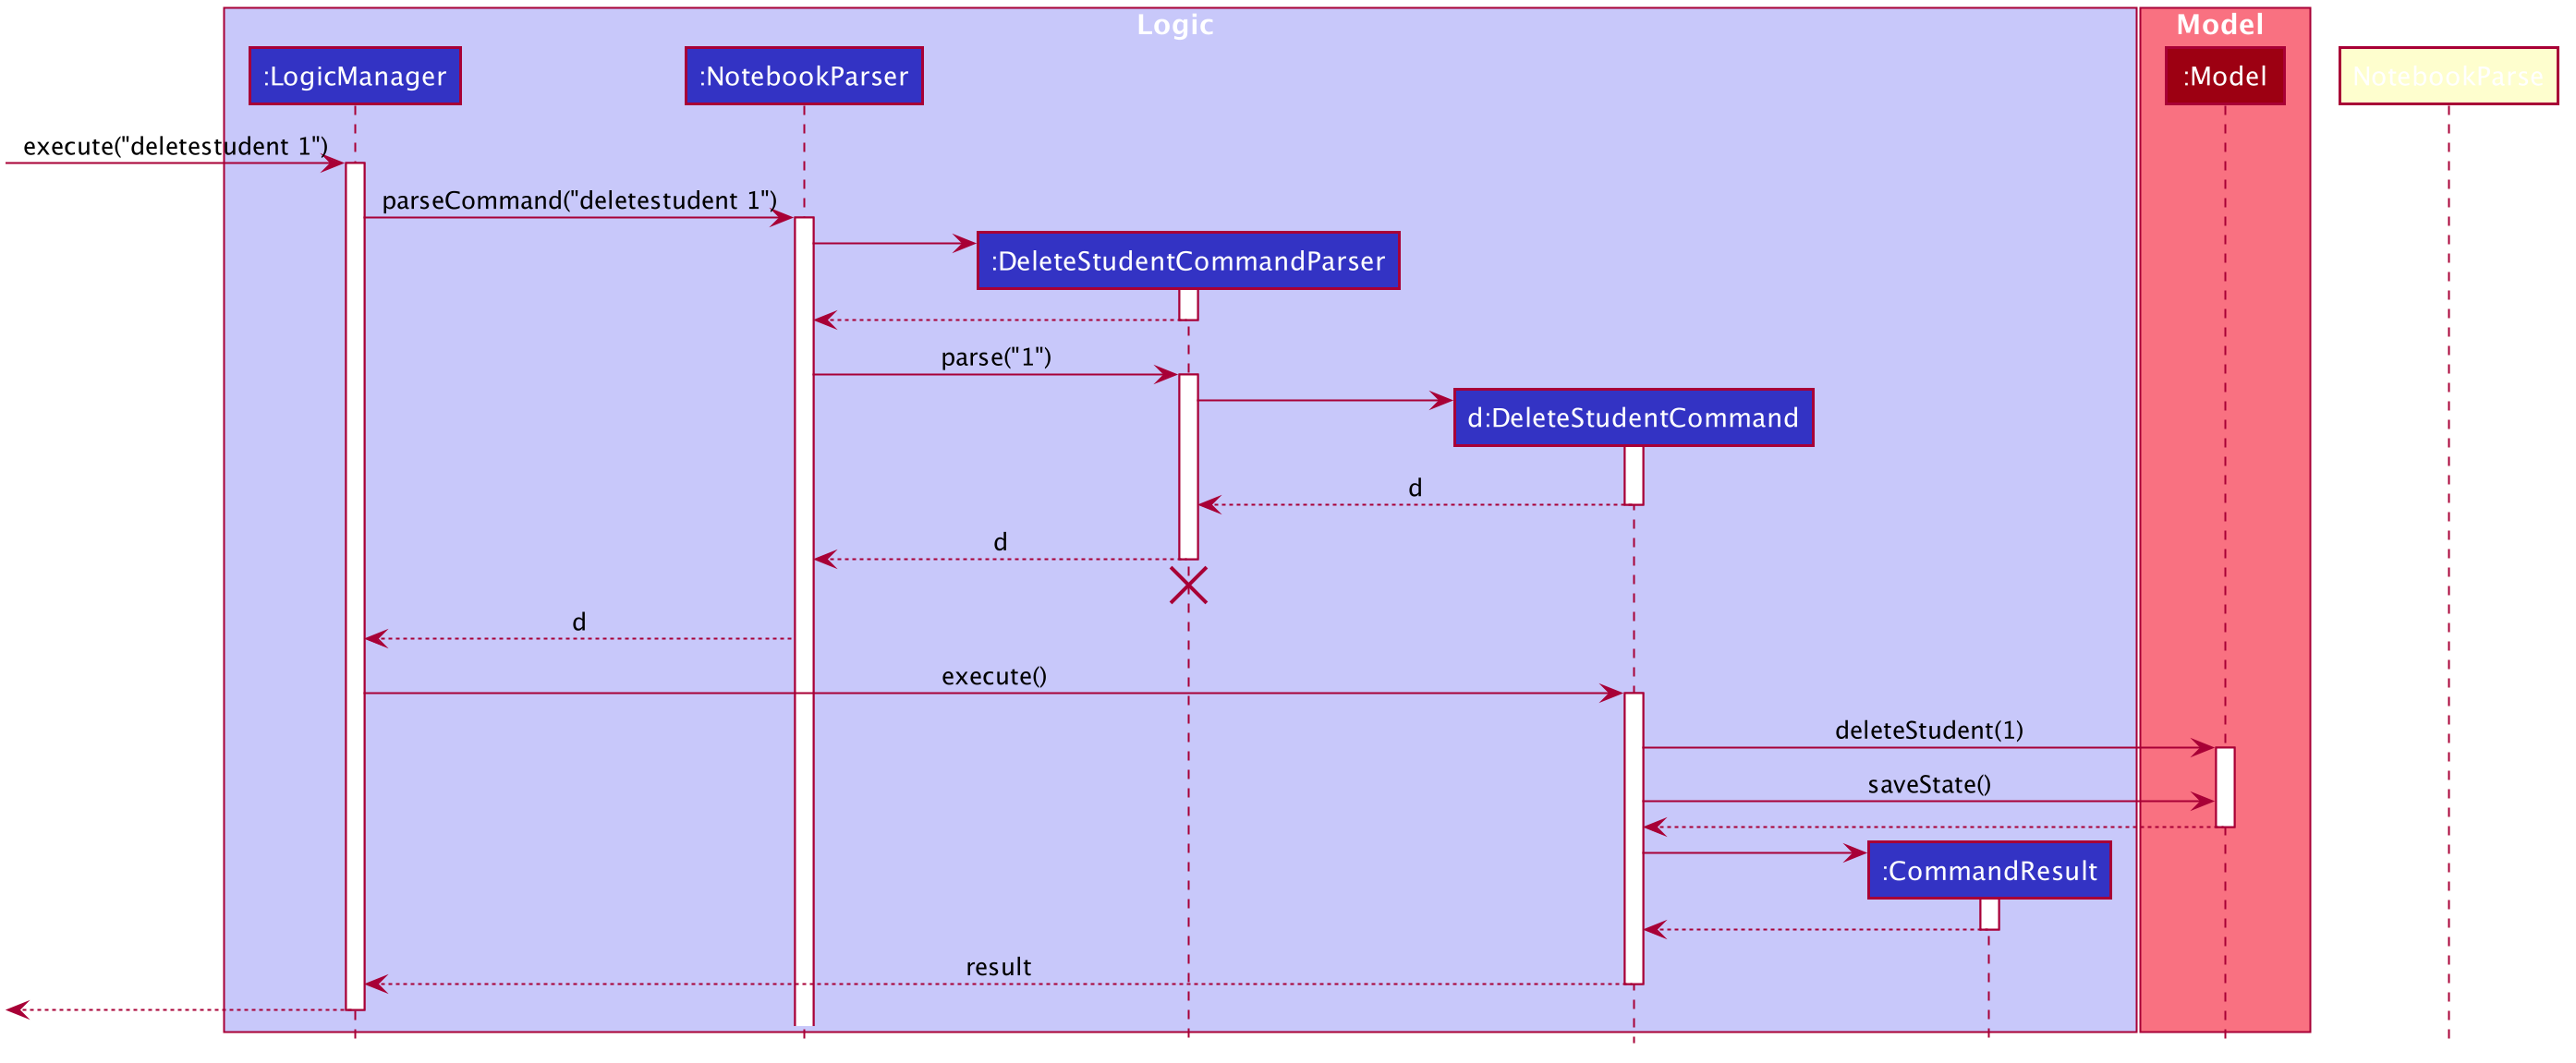
deletestudent 1 Command
The lifeline for DeleteStudentCommandParser should end at the destroy marker (X) but due to a limitation of PlantUML, the lifeline reaches the end of diagram.
|
2.4. Model component
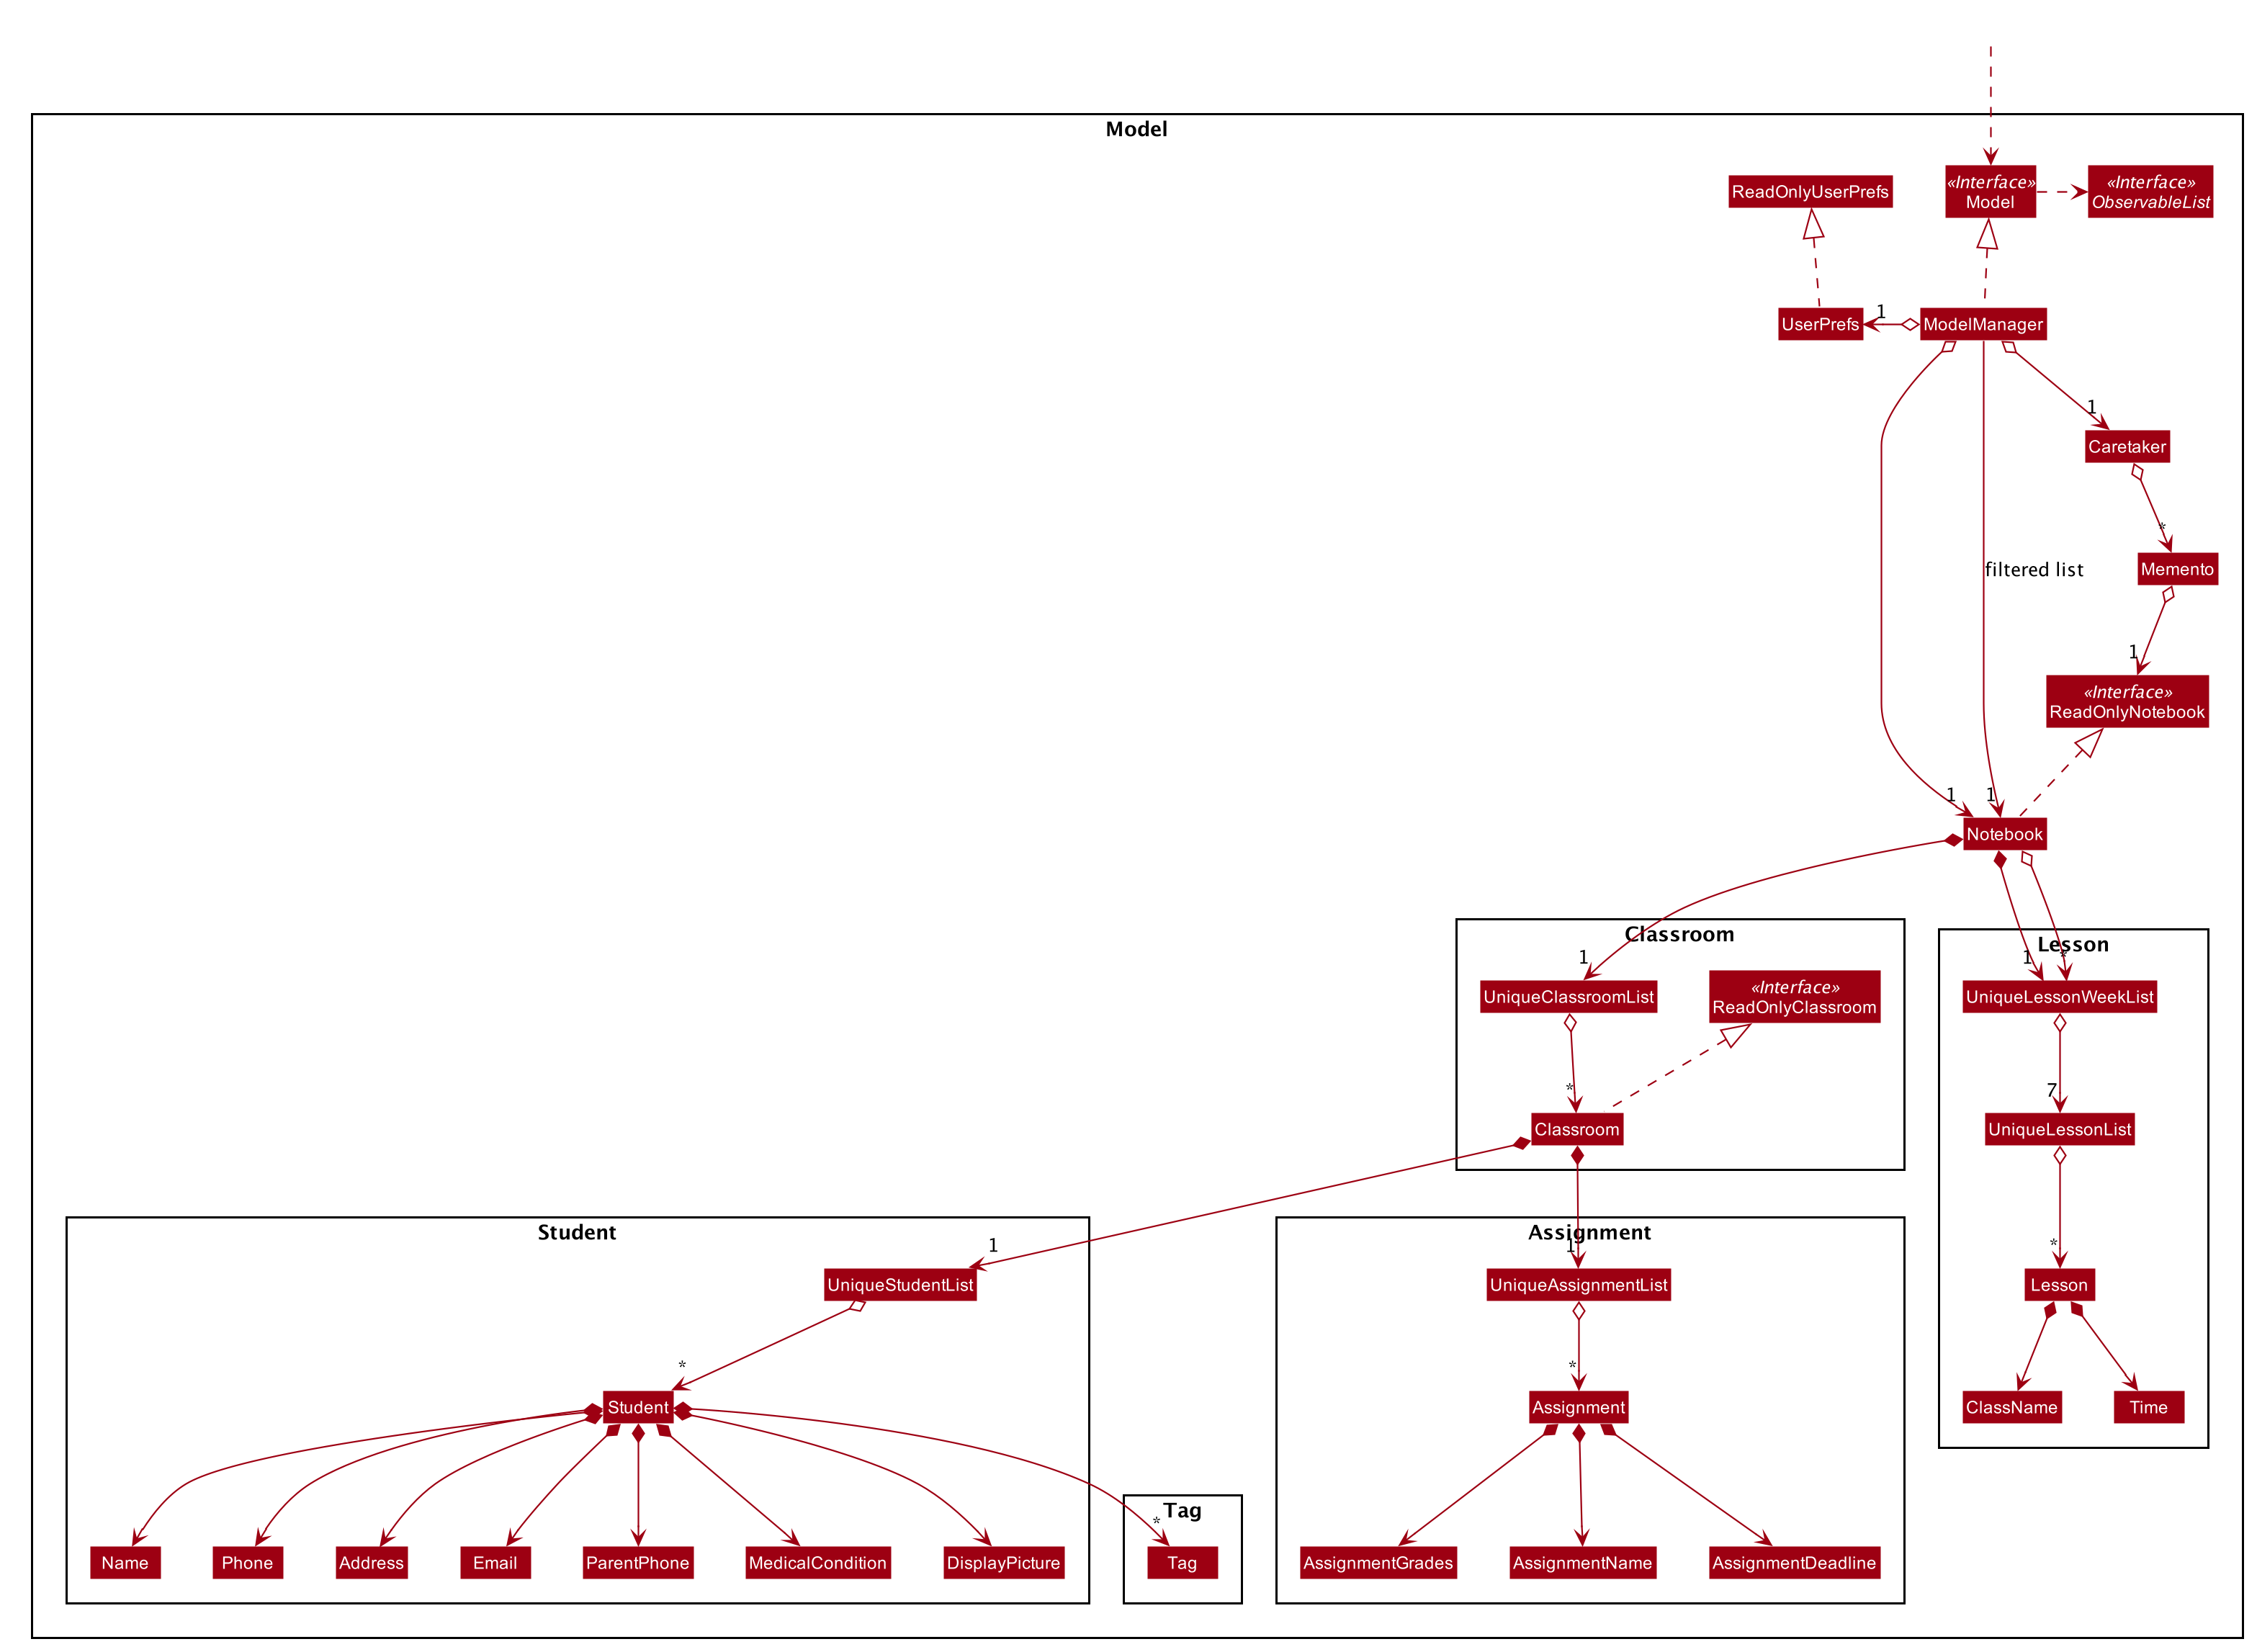
API : Model.java
The Model,
-
stores a
UserPrefobject that represents the user’s preferences. -
stores the Notebook data.
-
saves the state of the Notebook after each change in state for undo redo function.
-
exposes an unmodifiable
ObservableList<Classroom>,ObservableList<Student>,ObservableList<Assignment>, andObservableList<Lesson>that can be 'observed' e.g. the UI can be bound to this list so that the UI automatically updates when the data in the list change. -
does not depend on any of the other three components.
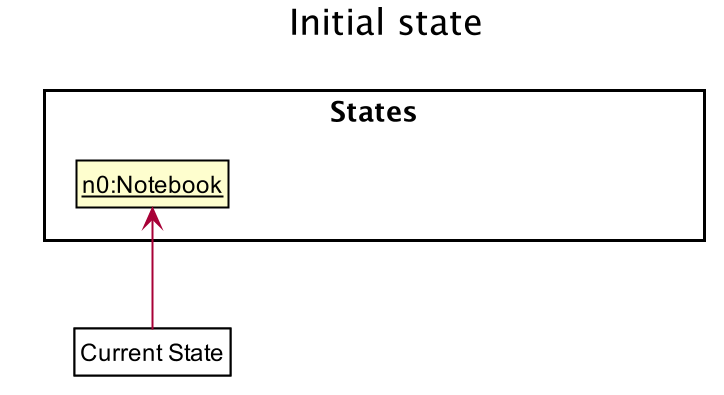
As a more OOP model, we can store a Tag list in Classroom, which Student can reference. This would allow Classroom to only require one Tag object per unique Tag, instead of each Student needing their own Tag object. An example of how such a model may look like is given below.
|
2.5. Storage component
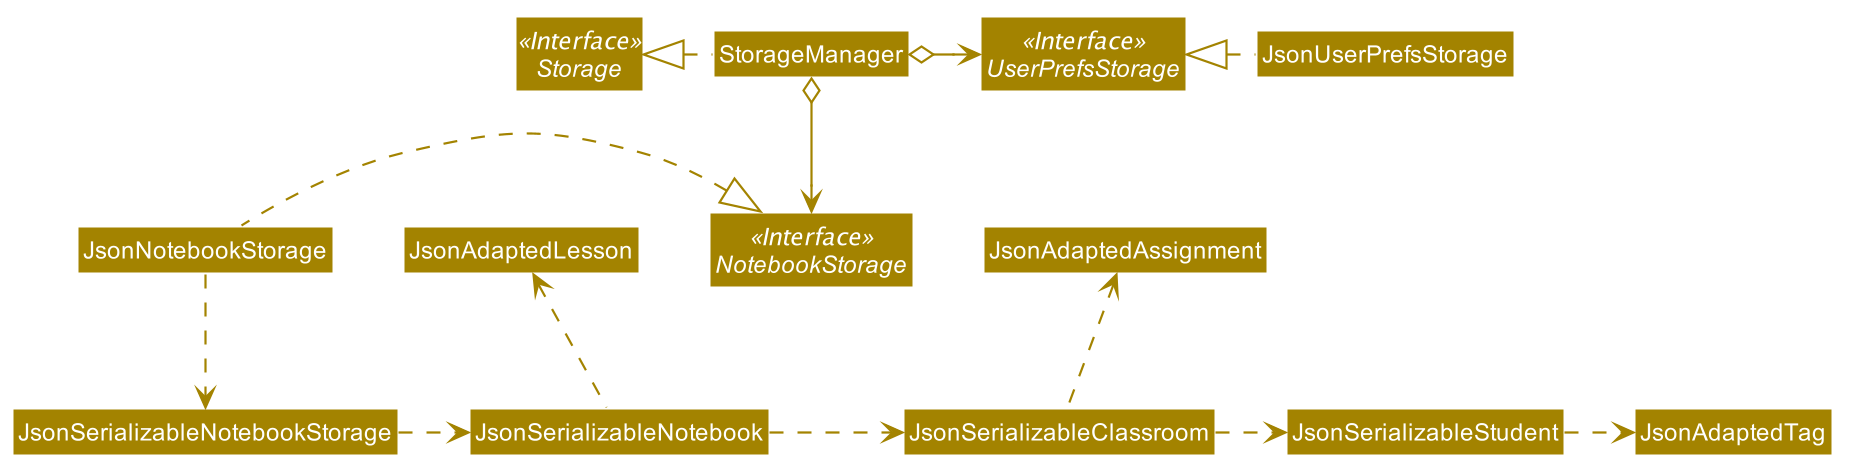
API : Storage.java
The Storage component,
-
can save
UserPrefobjects in json format and read it back. -
can save the Notebook data in json format and read it back.
2.6. Common classes
Classes used by multiple components are in the seedu.address.commons package.
3. Implementation
This section describes some noteworthy details on how certain features are implemented.
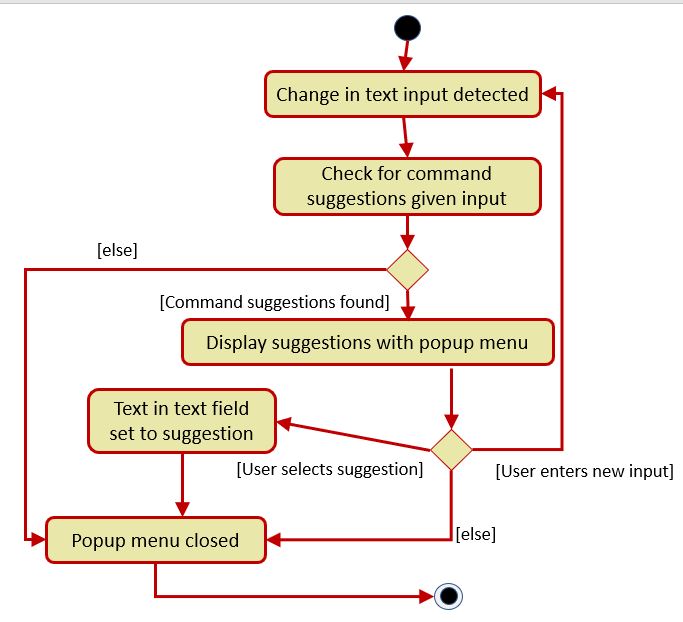
3.1. Autocomplete feature
3.1.1. Current Implementation
The AutoComplete feature is facilitated by 2 classes: the AutoCompleteTextField, and the class Styles.
Both are represented in the class diagram below.
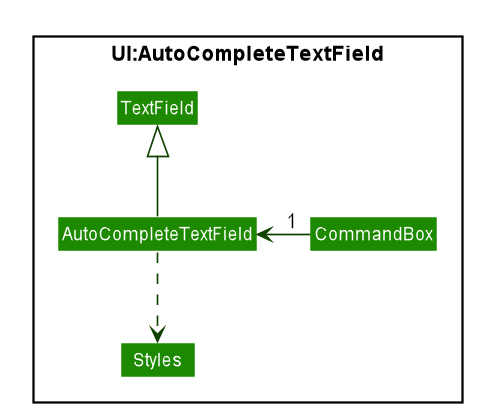
The AutoCompleteTextField adds a ChangeListener to textProperty() that notifies AutoCompleteTextField
whenever the user inputs new text, i.e when the text entered changes.
Step 1. User triggers the listener when user enters text.
Step 2. From the text entered, AutoCompleteTextField attempts suggesting existing commands.
If input matches any existing commands, it proceeds to step 3. Otherwise, it does nothing and waits for user input.
Step 3. AutoCompleteTextField calls `Styles#buildTextFlow`to highlight the portion of each
command suggestion where the user’s input matches the suggestion.
Step 4. AutoCompleteTextField then displays a popup menu using the javafx class ContextMenu.
Step 5. If the user selects a suggestion, the textfield is set to that suggestion, and the popup menu is
closed. If the user enters more text, AutoCompleteTextField returns to step 1.
Step 6. Otherwise, the popup menu is closed.
This sequence of steps is illustrated below with an activity diagram.
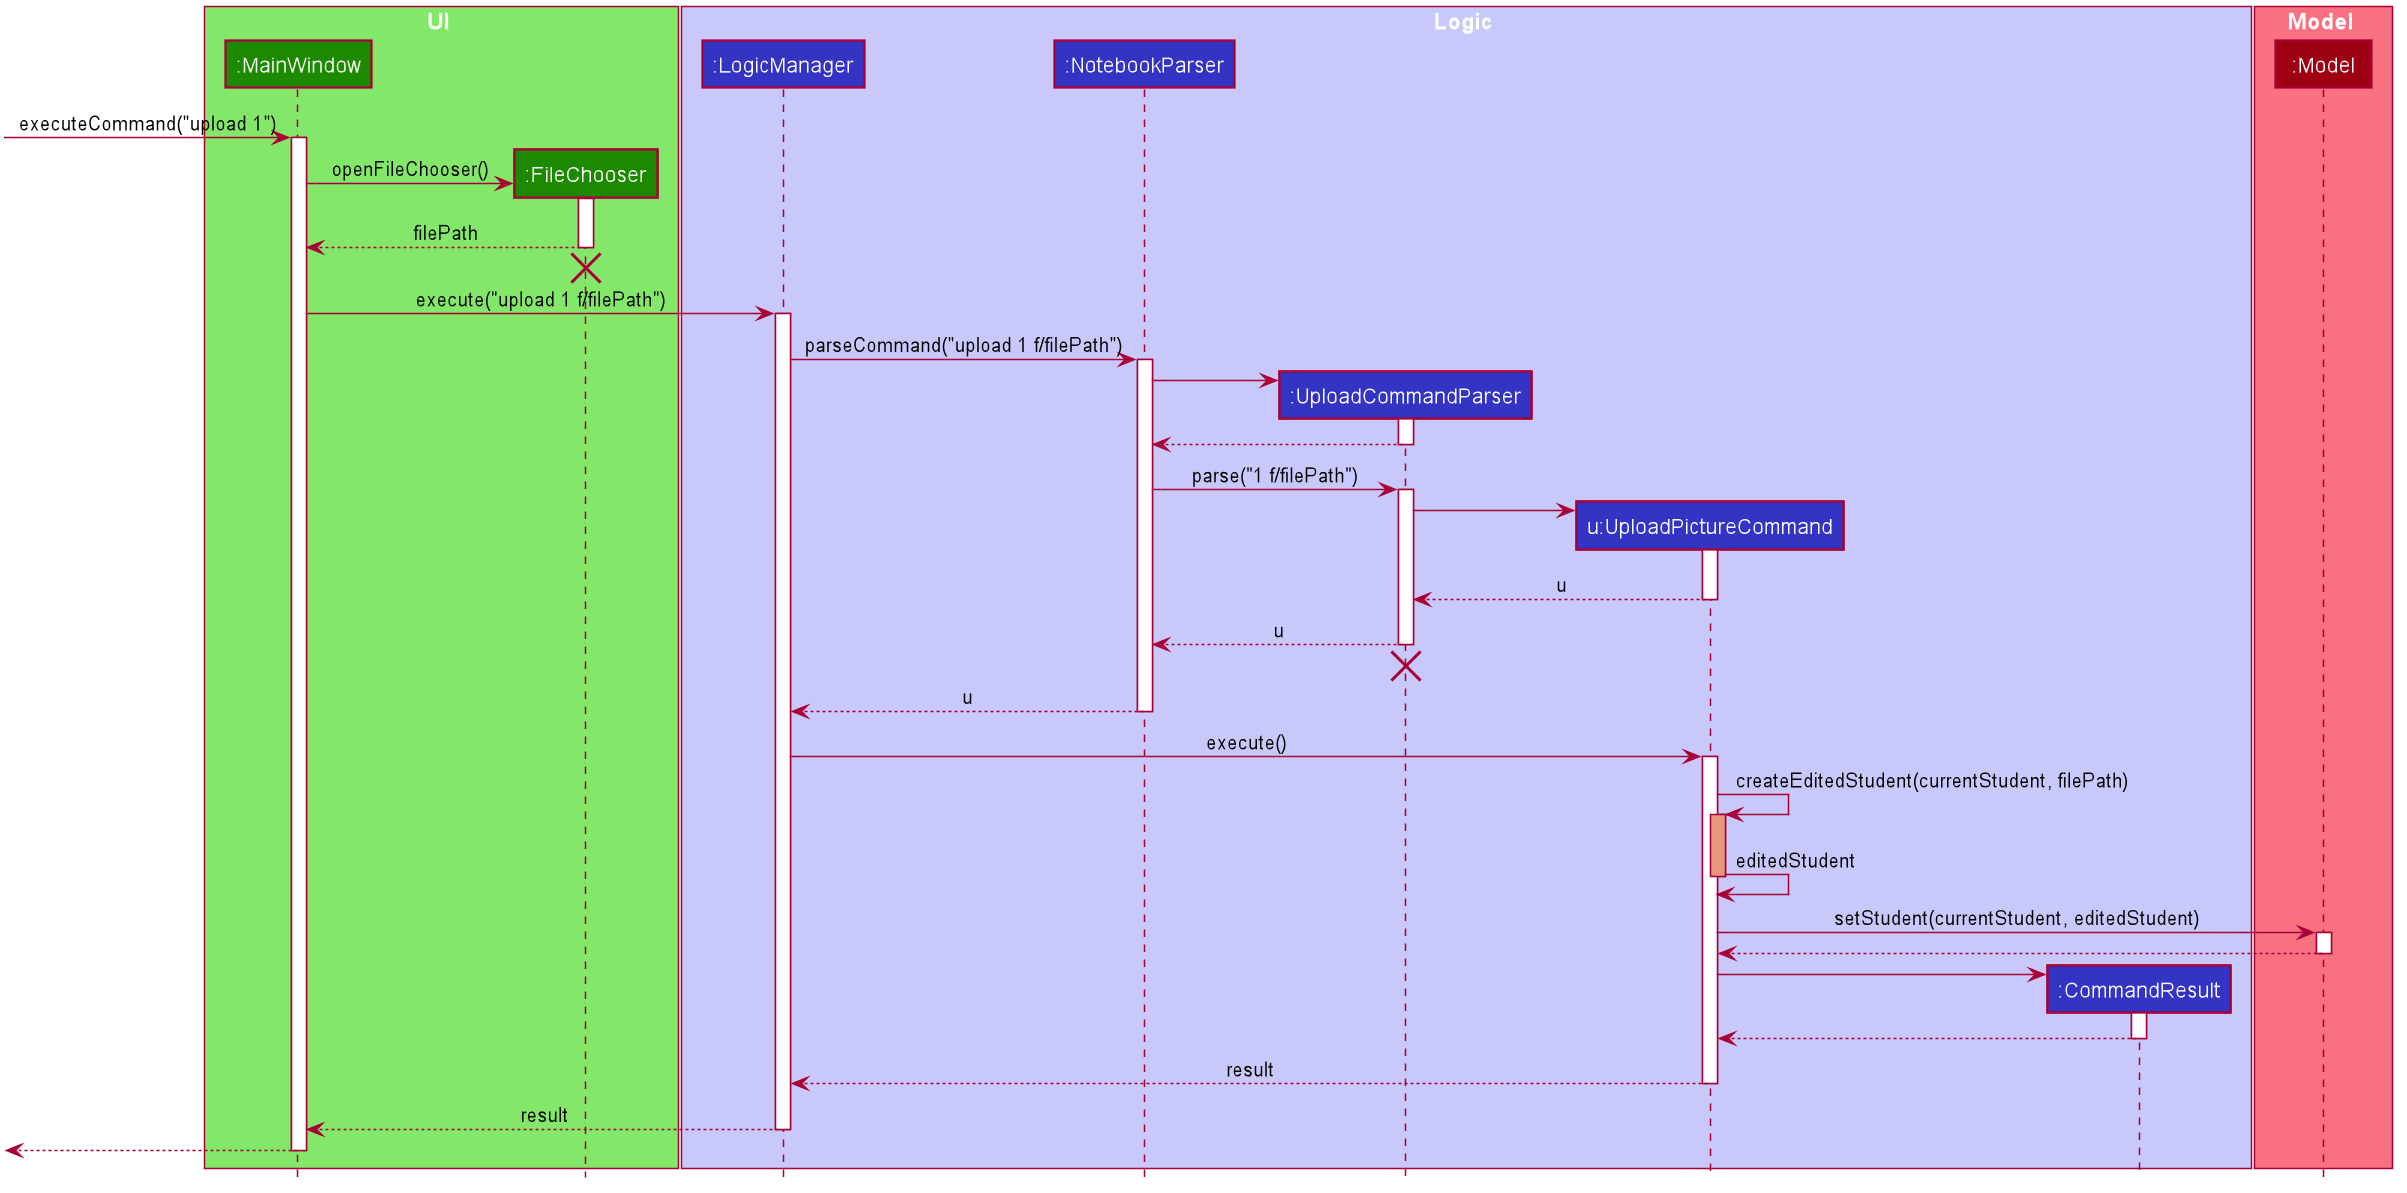
3.2. Upload feature
3.2.1. Current Implementation
The uploading of a student’s picture is facilitated by UploadPictureCommandParser, UploadPictureCommand, ModelManager, FileChooser and DisplayPicture,
while the displaying of the student’s picture is facilitated by MainWindow and StudentCard.
UploadPictureCommandParser implements Parser. UploadPictureCommand extends Command,
and represents the logic that will be executed once the user activates the upload command and chooses a file.
The UploadPictureCommand command communicates with ModelManager to replace the old Student object with
a new Student object that has its display picture field changed.
This change is then reflected in the UI when MainWindow loads the StudentCard for the new student,
which will load the image and display it in the UI.
The main operation implemented is UploadPictureCommand#execute.
Step 1. The user wants to upload a display picture for their student. User identifies the student’s index
number and enters the command upload INDEX.
Step 2. MainWindow detects the upload command word and uses FileChooser to open a window for the user to select a picture from their computer.
MainWindow then saves the path of the selected file as a string and adds a prefix "f/" to the input arguments.
The path of the file is also appended to the end of the input string before the input arguments are passed to NotebookParser
Step 3. NotebookParser parses the input and detects the upload command word, and calls UploadPictureCommandParser.
This in turn checks user’s input for errors before calling UploadPictureCommand, which checks whether the file
is a PNG or JPG file.
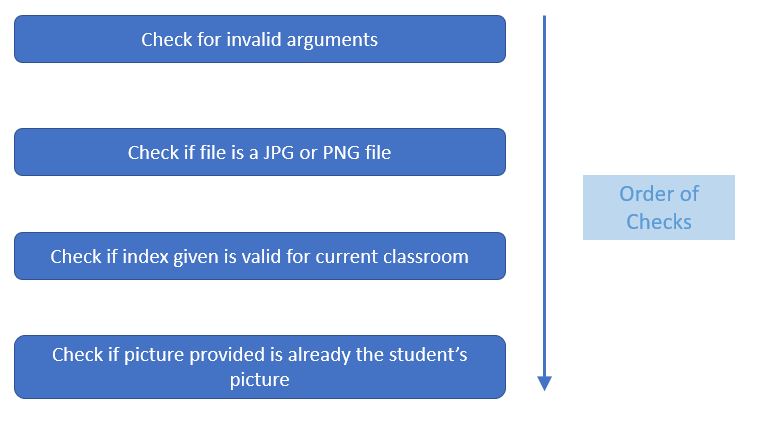
Step 4. LogicManager executes the UploadPictureCommand, which checks the validity of the index provided,
as well as whether the picture selected is different from the picture already displayed.
A visual representation of the order of checks for the input arguments are displayed in the diagram below.
Step 5. After these checks, the createEditedStudent method in UploadPictureCommand is called to create a new Student object, editedStudent,
which has its display filepath changed to the file the user chose.
Step 6. UploadPictureCommand calls Model to replace the current student with the editedStudent.
The command result is then passed back all the way to MainWindow which refreshes the GUI,
and displays the new picture for the chosen student.
The following diagram illustrates the process above.
3.3. Undo and Redo feature
3.3.1. Implementation
The undo/redo mechanism is facilitated by Caretaker, with each notebook state saved as a Memento.
It extends Notebook with an undo/redo history, stored internally as an mementos and statePointer.
Additionally, it implements the following operations:
-
Caretaker#saveState()— Saves the current notebook state in its history. -
Caretaker#undo()— Restores the previous notebook state from its history by undoing the previous command. -
Caretaker#redo()— Restores a previously undone notebook state from its history by redoing the previously undone command.
These operations are exposed in the Model interface as Model#saveState(), Model#undo() and Model#redo() respectively.
Given below is an example usage scenario and how the undo/redo mechanism behaves at each step.
Step 1. The user launches the application for the first time. The Caretaker will be initialized with the initial notebook state, and the statePointer pointing to that single notebook state.
Step 2. The user executes deletestudent 5 command to delete the 5th student in the current classroom. The deletestudent command calls Model#saveState(), causing the modified state of the notebook after the deletestudent 5 command executes to be saved in the mementos, and the statePointer is shifted to the newly inserted notebook state.
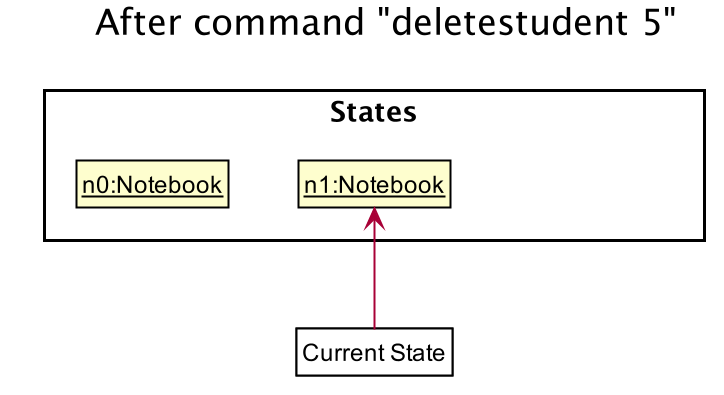
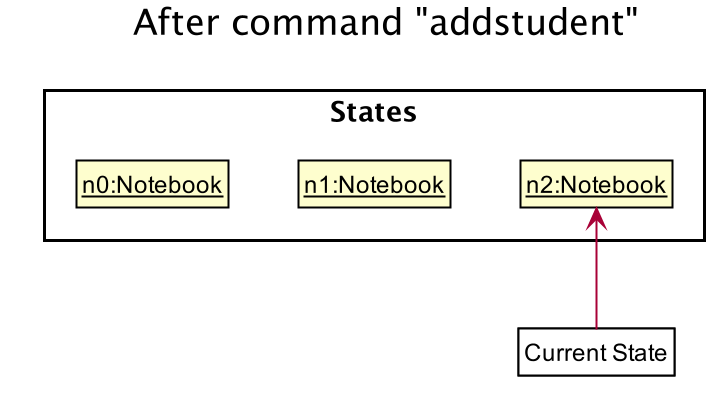
Step 3. The user executes addstudent n/David … to add a new student. The addstudent command also calls Model#saveState(), causing another modified notebook state to be saved into the mementos.
If a command fails its execution, it will not call Model#saveState(), so the notebook state will not be saved into the mementos.
|
Step 4. The user now decides that adding the student was a mistake, and decides to undo that action by executing the undo command. The undo command will call Model#undo(), which will shift the statePointer once to the left, pointing it to the previous notebook state, and restores the notebook to that state.
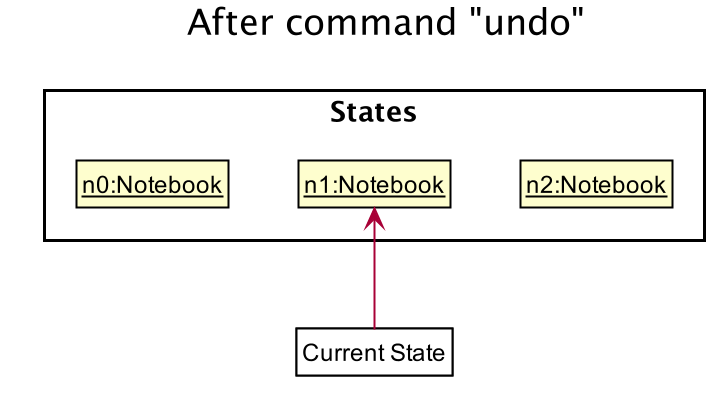
If the statePointer is at index 0, pointing to the initial notebook state, then there are no previous notebook states to restore. The undo command uses Model#canUndo() to check if this is the case. If so, it will return an error to the user rather than attempting to perform the undo.
|
The following sequence diagram shows how the undo operation works:
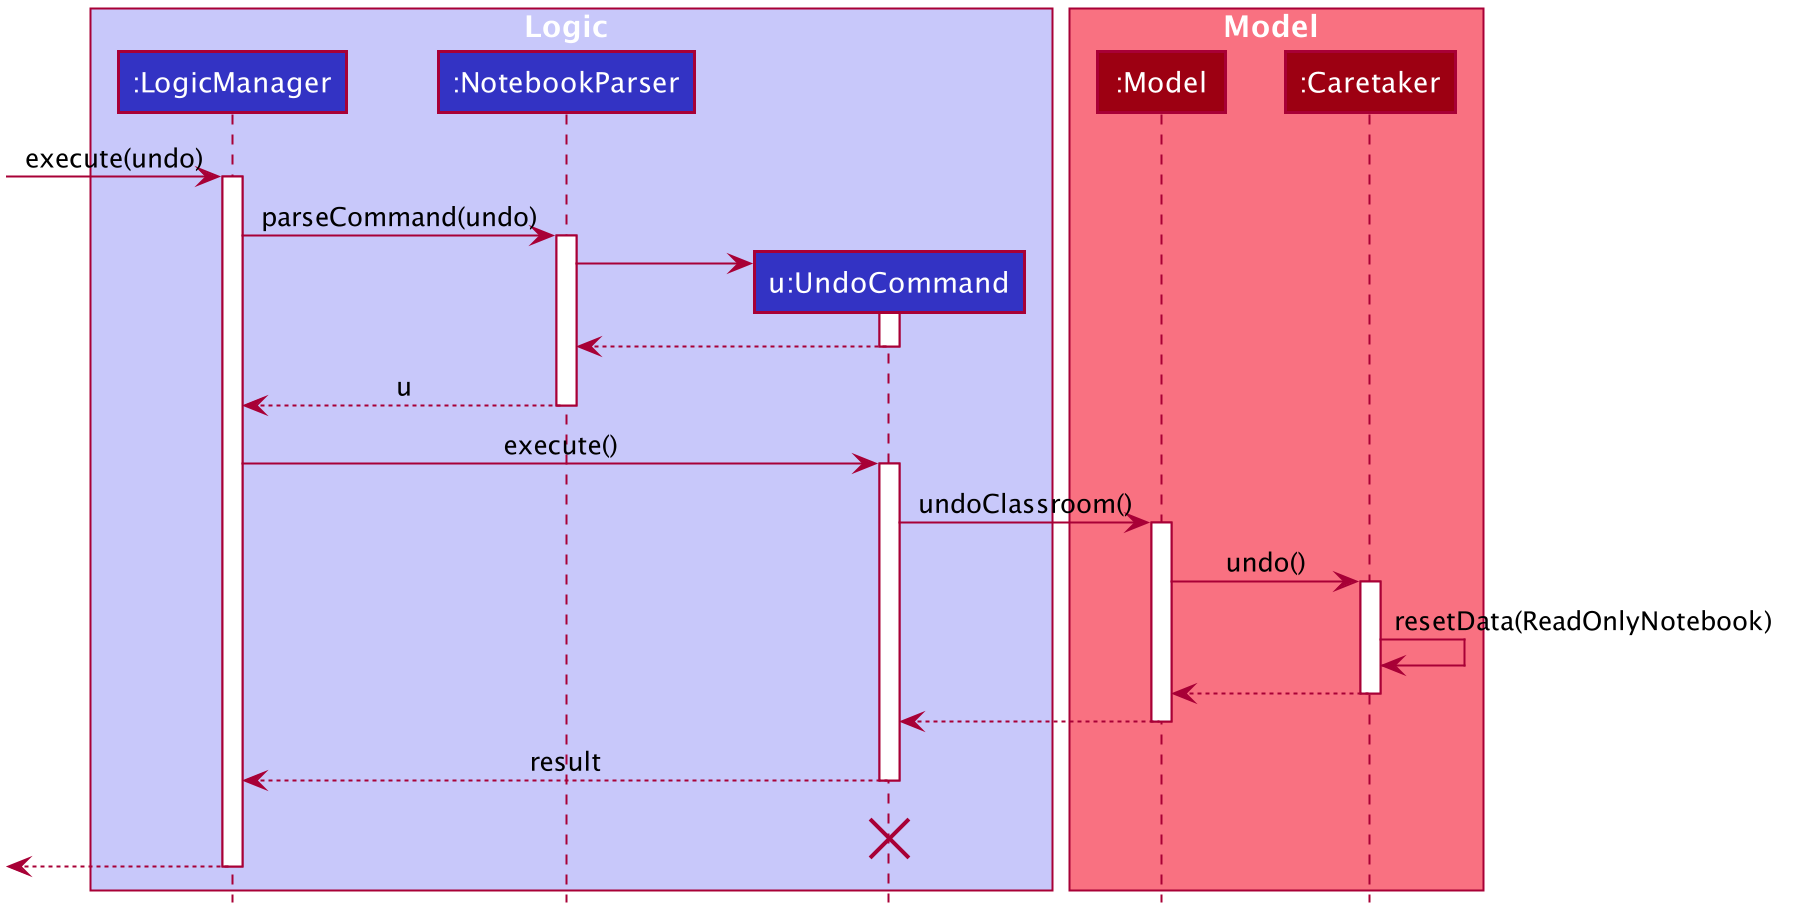
The lifeline for UndoCommand should end at the destroy marker (X) but due to a limitation of PlantUML, the lifeline reaches the end of diagram.
|
The redo command does the opposite — it calls Model#redo(), which shifts the statePointer once to the right, pointing to the previously undone state, and restores the notebook to that state.
If the statePointer is at index mementos.size() - 1, pointing to the latest notebook state, then there are no undone notebook states to restore. The redo command uses Model#canRedo() to check if this is the case. If so, it will return an error to the user rather than attempting to perform the redo.
|
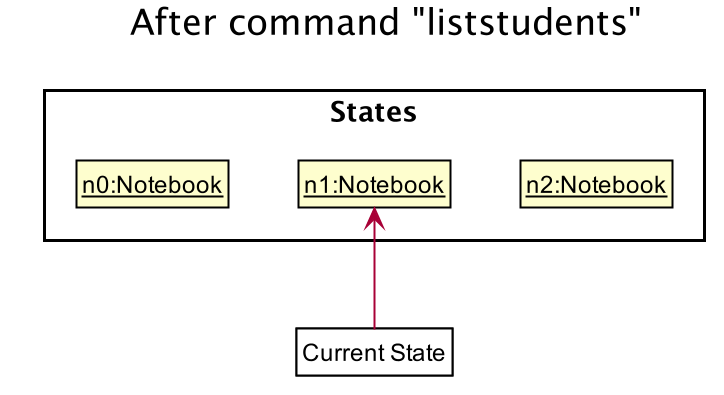
Step 5. The user then decides to execute the command liststudents. Commands that do not modify the classroom, such as liststudents, will usually not call Model#saveState(), Model#undo() or Model#redo(). Thus, the mementos remains unchanged.
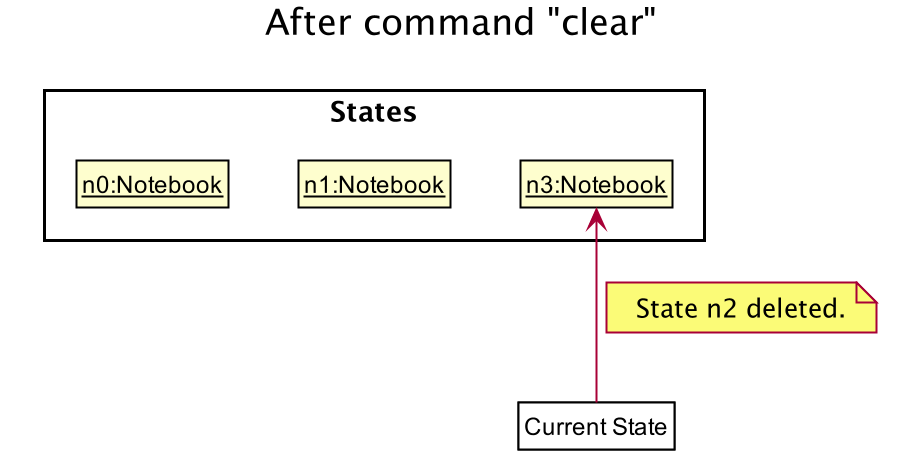
Step 6. The user executes clear, which calls Model#saveState(). Since the statePointer is not pointing at the end of the mementos, all notebook states after the statePointer will be purged. We designed it this way because it no longer makes sense to redo the addstudent n/David … command. This is the behavior that most modern desktop applications follow.
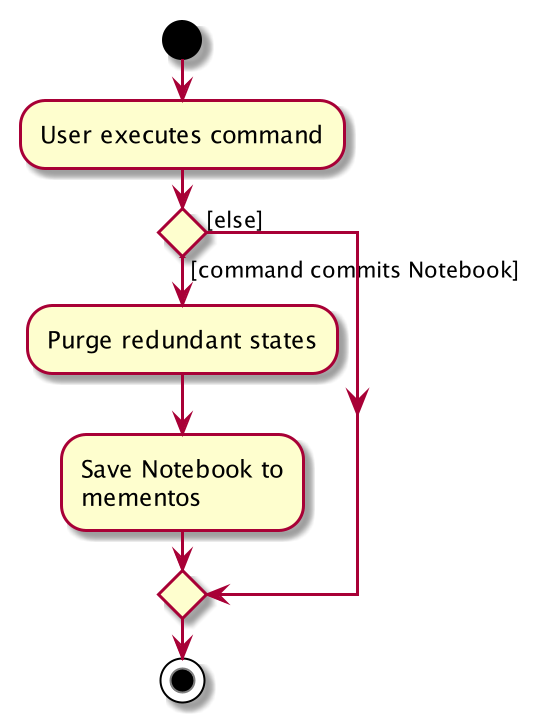
The following activity diagram summarizes what happens when a user executes a new command:
3.3.2. Design Considerations
Aspect: How undo & redo executes
-
Alternative 1 (current choice): Saves the entire notebook.
-
Pros: Easy to implement.
-
Cons: May have performance issues in terms of memory usage.
-
-
Alternative 2: Individual command knows how to undo/redo by itself.
-
Pros: Will use less memory (e.g. for
deletestudent, just save the student being deleted). -
Cons: We must ensure that the implementation of each individual command are correct.
-
Cons: Need to ensure that the commands are able to be executed at the correct index.
-
Aspect: Data structure to support the undo/redo commands
-
Alternative 1 (current choice): Use a list to store the history of notebook states.
-
Pros: Easy for new Computer Science student undergraduates to understand, who are likely to be the new incoming developers of our project.
-
Cons: Logic is duplicated twice. For example, when a new command is executed, we must remember to update both
HistoryManagerandCaretaker.
-
-
Alternative 2: Use
HistoryManagerfor undo/redo-
Pros: We do not need to maintain a separate list, and just reuse what is already in the codebase.
-
Cons: Requires dealing with commands that have already been undone: We must remember to skip these commands. Violates Single Responsibility Principle and Separation of Concerns as
HistoryManagernow needs to do two different things.
-
3.4. Assignment feature
3.4.1. Implementation
The Assignment class works with high similarity to the Student Class implemented.
A UniqueList of Assignments exist in the Classroom Class alongside the UniqueList of Students, and serve to keep track of assignments for a particular Classroom.
The commands that work in similar fashion to Student Class are:
AddAssignment, DeleteAssignment, EditAssignment, ListAssignment
Additionally, it implements the following operations:
-
UniqueAssignmentList#addAssignment()— Adds a new Assignment object to the UniqueAssignmentList. -
UniqueAssigmentList#remove()— Removes a Lesson object from the UniqueAssignmentList. -
UniqueAssignmentList#setAssignment()— Updates the Assignment with user input.
The Assignment class keeps track of the grades of all students in the class for a particular assignment. This feature is necessary to users to monitor the progress of every student, and to provide assistance to students who might be failing their tests. Each Assignment contains the following classes: AssignmentName, AssignmentGrade, and AssignmentDeadline.
-
The AssignmentName stores the name of the assignment.
-
The AssignmentGrade class contains the grades of every student in the class through a LinkedHashMap<String studentName, String marks>.
-
The AssignmentDeadline class contains the time when the assignment is due.
Upon creation of a new Assignment, Assignment#initialiseGrades() is called, which populates the LinkedHashMap
with keys (students' names) and the value "Not Submitted". The user can then update the grades of a student individually or
all of the students simultaneously through the UpdateGrades command, which calls the method Assignment#setGrades().
After every command, Assignment#checkCompletion() is called to determine the completion status of the assignment,
which will be "Completed" if none of the grades are "Not Submitted". Upon addition of a new student into the classroom,
each Assignment present in the classroom will add another entry into the AssignmentGrade. If the Assignment was Not Completed,
the value "Not Submitted" will be paired with the key through the method Assignment#addNewStudentGrade. Should the Assignment have been Completed, the value "Late to the party" will be paired instead through the method Assignment#addOneStudentGrade, indicating that the student does not need to submit said assignment any longer, since it has already been graded before he/she joined the classroom.
3.5. Get grades feature
3.5.1. Implementation
The current GetStudentGradesCommand will retrieve all the grades of a particular student. This is done through iterating through the FilteredAssignmentList, and pulling all the grades of a specified student. Additionally, it implements the following operations through Commands:
-
Assignment#getGrades()— Retrieves the Map that contains students' names as the key and students' grades as the value.
The following sequence diagram shows how the get grades operation works:
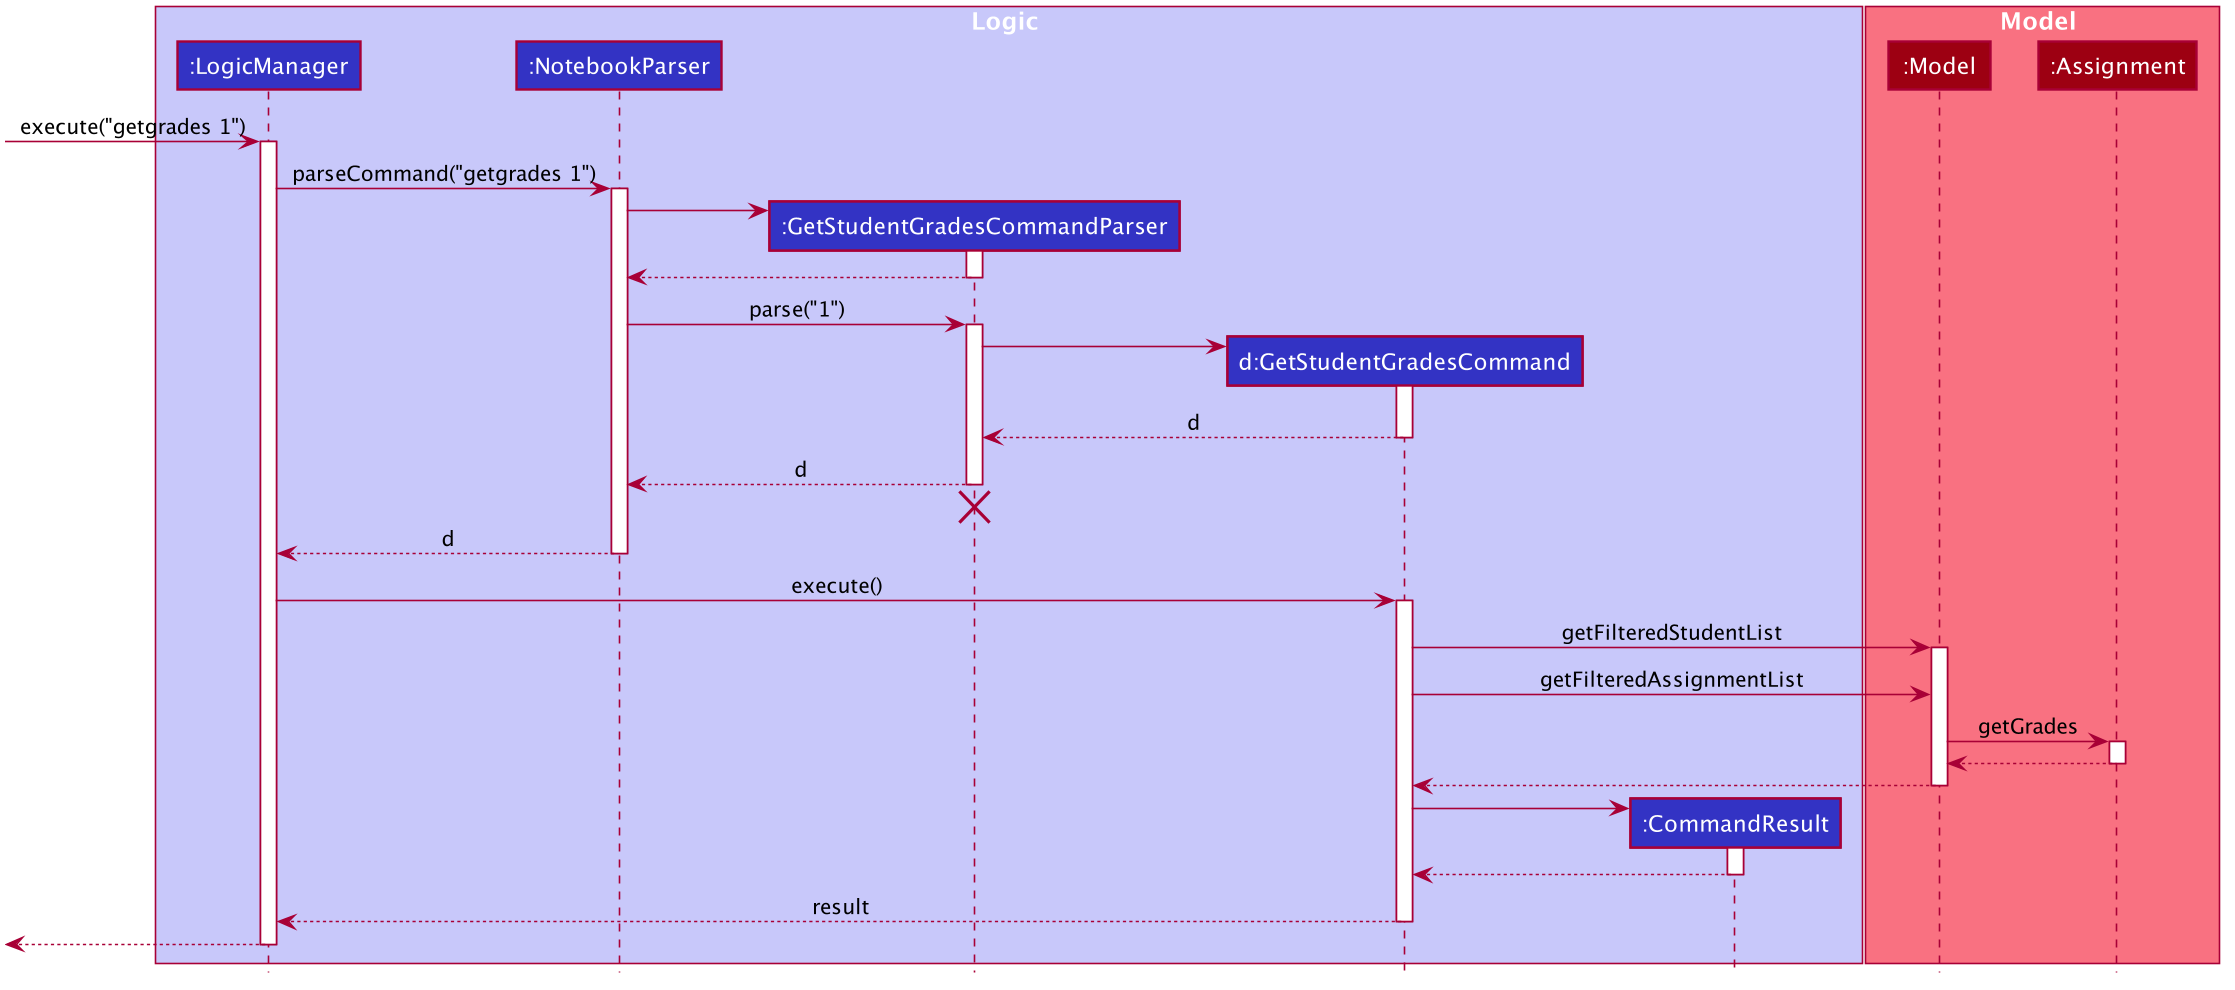
After getting the Map from the getGrades() method, if the key of the current key-value pair is equals to the name of the student,
the value, which is the grades of the student, will be added to the output that will be shown in the CommandResult.
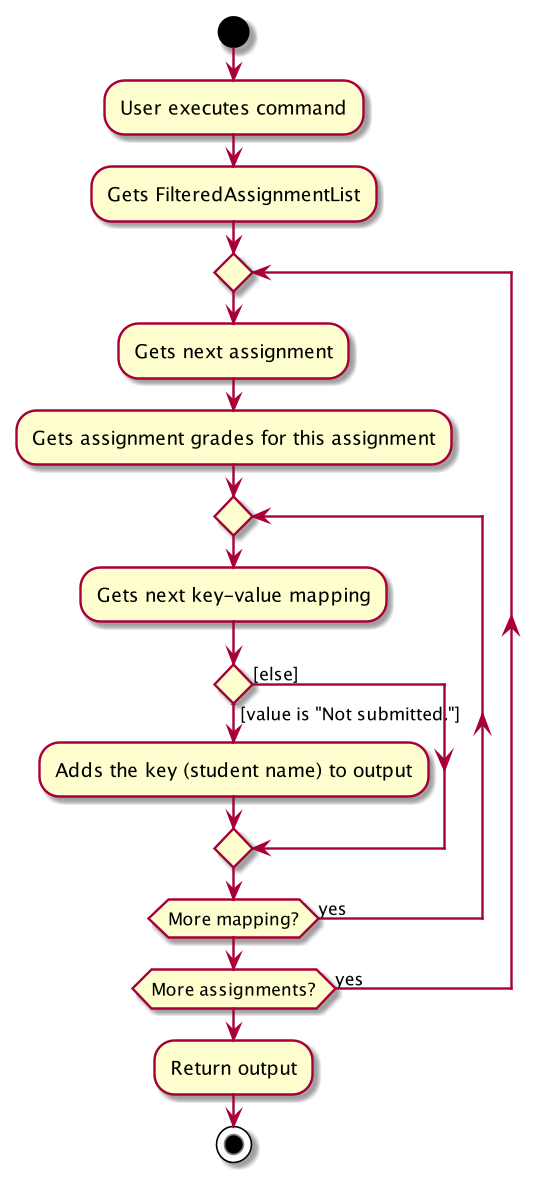
3.6. Get unsubmitted assignments feature
3.6.1. Implementation
The implementation for getting unsubmitted assignments is similar to the get submitted feature, except that it will search for values of "Not submitted." instead.
The following activity diagram shows how the get unsubmitted operation works:
3.7. Lesson Feature
3.7.1. Implementation
The Lesson class works with high similarity to the Student Class implemented. A UniqueList of Lessons exist in the Notebook alongside the UniqueList of Classrooms, and serve to keep track of lessons for the user. Additionally, it implements the following operations through Commands:
-
UniqueLessonList#addLesson()— Adds a new Lesson object to the UniqueLessonList. -
UniqueLessonList#remove()— Removes a Lesson object from the UniqueLessonList. -
Lesson#set()— Updates the Lesson with user input.
3.8. Scheduling Feature
3.8.1. Implementation
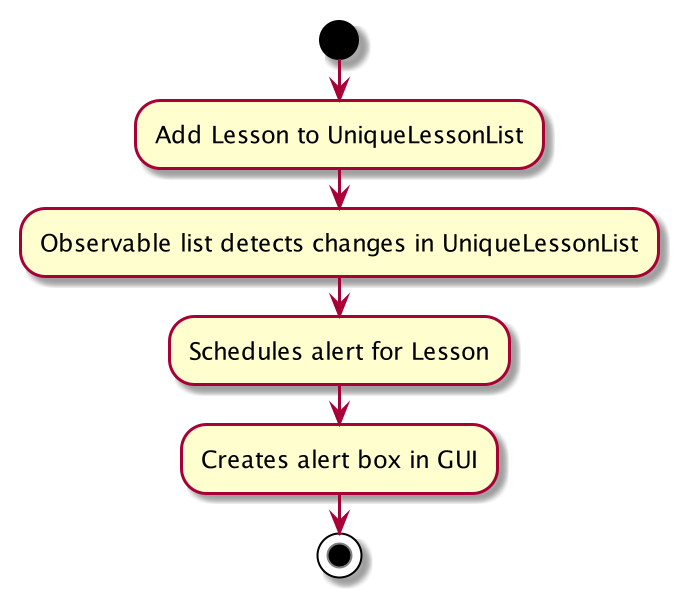
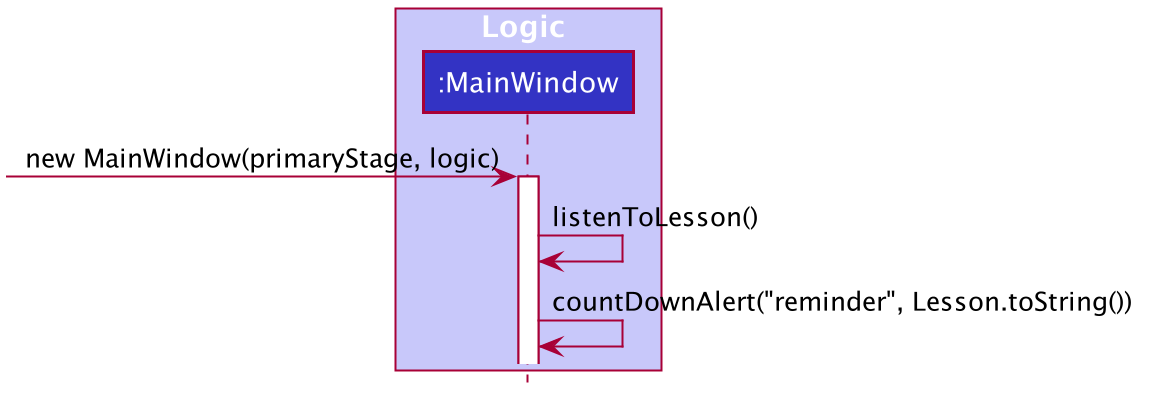
When a new Lesson is added to the UniqueLessonList, a listener attached to the list will be triggered and it will create a scheduler to schedule the lesson. Once the timing of lesson is reached, an alert box will be created in the GUI to serve as a reminder.
The following activity and sequence diagram shows how the scheduling operation works:
3.9. Logging
We are using java.util.logging package for logging. The LogsCenter class is used to manage the logging levels and logging destinations.
-
The logging level can be controlled using the
logLevelsetting in the configuration file (See Section 3.10, “Configuration”) -
The
Loggerfor a class can be obtained usingLogsCenter.getLogger(Class)which will log messages according to the specified logging level -
Currently log messages are output through:
Consoleand to a.logfile.
Logging Levels
-
SEVERE: Critical problem detected which may possibly cause the termination of the application -
WARNING: Can continue, but with caution -
INFO: Information showing the noteworthy actions by the App -
FINE: Details that is not usually noteworthy but may be useful in debugging e.g. print the actual list instead of just its size
3.10. Configuration
Certain properties of the application can be controlled (e.g user prefs file location, logging level) through the configuration file (default: config.json).
4. Documentation
Refer to the guide here.
5. Testing
Refer to the guide here.
6. Dev Ops
Refer to the guide here.
Appendix A: Product Scope
Target user profile:
-
needs to keep track of vast amount of information on students and homework
-
has many deadlines to keep track of
-
prefer desktop apps over mobile or written
-
can type fast
-
prefers typing over mouse input
-
is reasonably comfortable using CLI apps
-
likes being organised
Value proposition: manage students, deadlines, homework in one place.
Appendix B: User Stories
Priorities: High (must have) - * * *, Medium (nice to have) - * *, Low (unlikely to have) - *
| Priority | As a … | I want to … | So that I can… |
|---|---|---|---|
|
teacher |
keep track of my students’ progress |
understand which student to help more |
|
teacher |
keep track of all my administrative duties |
focus on providing the best education I can for my students |
|
slave-driving teacher |
keep track of my students’ submissions |
follow up if they have undone assignments |
|
thoughtful teacher |
keep track of important details of students |
establish rapport with them |
|
responsible teacher |
keep track of all the deadlines that I have |
set a good example for my students |
|
concerned teacher |
want to be able to access parents’ contact details |
communicate often and openly with them about their child |
|
caring teacher |
know any health issues students may have |
look out for which students I have to take more care of |
|
new user |
see usage instructions |
refer to instructions when I forget how to use the App |
|
teacher |
what my next lessons are |
avoid being late for lessons. |
|
teacher |
keep track of students’ behaviour in class |
so I can chart my students' growth or misbehaviour |
|
teacher |
record feedback from students |
help them with issues that they may have |
|
teacher |
know what homework the students already have |
understand how much homework I can assign to them next |
|
teacher |
know students' MBTI |
cater lessons to their respective learning styles |
|
teacher |
know their astrological signs |
know which students are compatible with each other |
|
teacher |
monitor my students’ social media |
know how they are faring in their personal life |
|
teacher |
be bilingual and know the pronunciation of their Mother Tongue names |
can respect their culture |
|
teacher |
know their number of demerit points |
put them in the first row in class |
Appendix C: Use Cases
(For all use cases below, the System is the Teacher’s Notebook and the Actor is the user, unless specified otherwise)
Use case: Delete student
MSS
-
User requests to list students
-
Notebook shows a list of students
-
User requests to delete a specific student in the list
-
Notebook deletes the student
Use case ends.
Extensions
-
2a. The list is empty.
Use case ends.
-
3a. The given index is invalid.
-
3a1. Notebook shows an error message.
Use case resumes at step 2.
-
Use case: Edit assignment
MSS
-
User requests to list assignments
-
Notebook shows a list of assignments
-
User requests to edit a specified assignment in the list
-
Notebook edits the student
Use case ends.
Extensions
-
2a. The list is empty.
Use case ends.
-
3a. The given index is invalid.
-
3a1. Notebook shows an error message.
-
-
3b. There is a similar assignment in the list as the one that user wants to edit to.
-
3b1. Notebook shows an error message.
Use case resumes at step 2.
-
Use case: Undo
MSS
-
User requests to do a command.
-
Notebook does the action.
-
User requests to undo.
-
Notebook undoes action 2, action from step 2 is undone.
Use case ends.
Extensions
-
1a. The given command is invalid.
-
1a1. Notebook shows an error message.
Use case resumes at step 1.
-
-
3a. The action cannot be undone as it does not change the state of the notebook.
-
3a1. Notebook shows an error message.
Use case resumes at step 1.
-
Appendix D: Non Functional Requirements
-
Should work on any mainstream OS as long as it has Java
11or above installed. -
Should be able to store and retrieve 5 classes of 30+ students without sluggishness.
-
A user with above average typing speed for regular English text (i.e. not code, not system admin commands) should be able to accomplish most of the tasks faster using commands than using the mouse.
-
Should be able to display student’s photos in 4k resolution.
-
Application should respond within 3 seconds.
-
User should enjoy looking at the application.
-
User should be able to view and undo changes.
-
Application should run without needing an Internet connection.
-
Application should be easy to use and understand for first time users.
Appendix F: Product Survey
Product Name Teacher’s Notebook
Author:
-
Loh Wei Kiat weikiat97@github.com
-
Sebastian Lie Hsien Yong SebastianLie@github.com
-
Tay Sheryl sheryltay28@github.com
-
Yoon Jia Jun, Ken Xelyion@github.com
Pros:
-
Useful for teachers to consolidate all the information related to their class.
-
Easy to navigate and understand how the application works.
Cons:
-
Unable to pop out reminder when the application is not opened.
Appendix G: Instructions for Manual Testing
Given below are instructions to test the app manually.
| These instructions only provide a starting point for testers to work on; testers are expected to do more exploratory testing. |
G.1. Launch and Shutdown
-
Initial launch
-
Download the jar file and copy into an empty folder
-
Run the jar file on the command line by typing
java -jar teachersnotebook.jar.
Expected: Shows the GUI with a set of sample contacts. The window size may not be optimum.
-
-
Saving window preferences
-
Resize the window to an optimum size. Move the window to a different location. Close the window.
-
Re-launch the app by typing
java -jar teachersnotebook.jarin the command line.
Expected: The most recent window size and location is retained.
-
G.2. Deleting a student
-
Deleting a student while all students are listed
-
Prerequisites: List all students using the
liststudentscommand. Multiple students in the list. -
Test case:
deletestudent 1
Expected: First contact is deleted from the list. Details of the deleted contact shown in the status message. Timestamp in the status bar is updated. -
Test case:
deletestudent 0
Expected: No student is deleted. Error details shown in the status message. Status bar remains the same. -
Other incorrect delete commands to try:
deletestudent,deletestudent x(where x is larger than the list size) {give more}
Expected: Similar to previous.
-
G.3. Undo / Redo
-
Undoing a command that was previously done, and redoing it after.
-
Prerequisites: A command that changes the state of the notebook should be executed (e.g. add / edit / delete).
-
Test case (assume a student was added in the previous command execution):
undo
Expected: The previously added student will now be removed. Command result will show the message 'Undo success!". Student panel will show that the student is no longer in the list. -
Test case (assume the only previous command was
listassignments):undo
Expected: There will be undo command executed. Reason is because there is no change in the state of the notebook. Command result will show the message 'There is no action to undo!'. -
Test case (assume a student was added in the previous command execution):
undo, followed byredo
Expected: When undo is executed, student will be removed from the list just like in test case 1. When redo is executed, the student that was previously removed will now be added back again. Command result will show the message 'Redo success!'. Student panel will show that the student is now back in the list. -
Other incorrect undo / redo commands to try:
undo x,redo x,undoes,redoes
-
G.4. Saving data
-
Dealing with missing/corrupted data files
-
If the data file is missing, the application will simply start from a new notebook that is populated with several data size. User can use the command
clearto get an empty notebook.
Expected: New notebook with populated data. -
If the data file is corrupted, users should delete the notebook.json file and restart from a new notebook. It may be tough to rectify the json file without knowing the internal structure of the application.
Expected: New notebook with populated data.
-