Overview
This project portfolio details my key contributions to Project Teacher’s Notebook.
Teacher’s Notebook is a desktop application designed by my group mates and I for a software engineering module in National University of Singapore (NUS). It’s target audience is secondary or primary school teachers in Singapore. It aims to improve the efficiency of these teachers, by being a one-stop platform to consolidate information that teachers would need.
The user interacts with Teacher’s Notebook using a Command Line Interface (CLI), and it has a Graphical User Interface (GUI) created with JavaFX. It is written in Java, and has about 10 kLoC
Summary of Contributions
-
Major Enhancement: added the autocomplete feature to the gui
-
What it does: add a popup menu that suggests commands to the user based on text the user has already entered
-
Justification: Many commands in Teacher’s Notebook are long and tedious, and have specific prefixes or formats. By suggesting commands, users can quickly become familiar with commands, and save time not needing to remember the format of commands. It also serves as a shortcut, as users can quickly enter commands without typing out the entire command. and easily select
-
Highlights: This enhancement allows the user to view up to 10 suggestions in a popup menu. The user can scroll through all suggestions and select any suggestion just using their keyboard. Commands suggested are already in their required form with prefixes, making it easier for users to execute the intended command successfully without referring to the UserGuide.
-
-
Minor Enhancement: added the ability to upload a picture of a student, in only a PNG or JPG format.
-
Minor Enhancement: added the ability to scroll through previously entered commands with the up and down arrow keys
-
Code Contributed [Functional Code] [RepoSense ]
-
Other contributions:
Contributions to User Guide
Given below are sections I contributed to the User Guide. They showcase my ability to write documentation targeting end-users. |
User-Friendly Features
The features here do not necessarily contribute directly to a teacher’s everyday job, but improve the usability
of Teacher’s Notebook and make using the application a more forgiving, painless and seamless experience.
Autocomplete
Allows a user to toggle through suggestions that guess at what command the user wants to type in.
Upon typing any letters that resemble commands, a popup menu will appear as shown below:
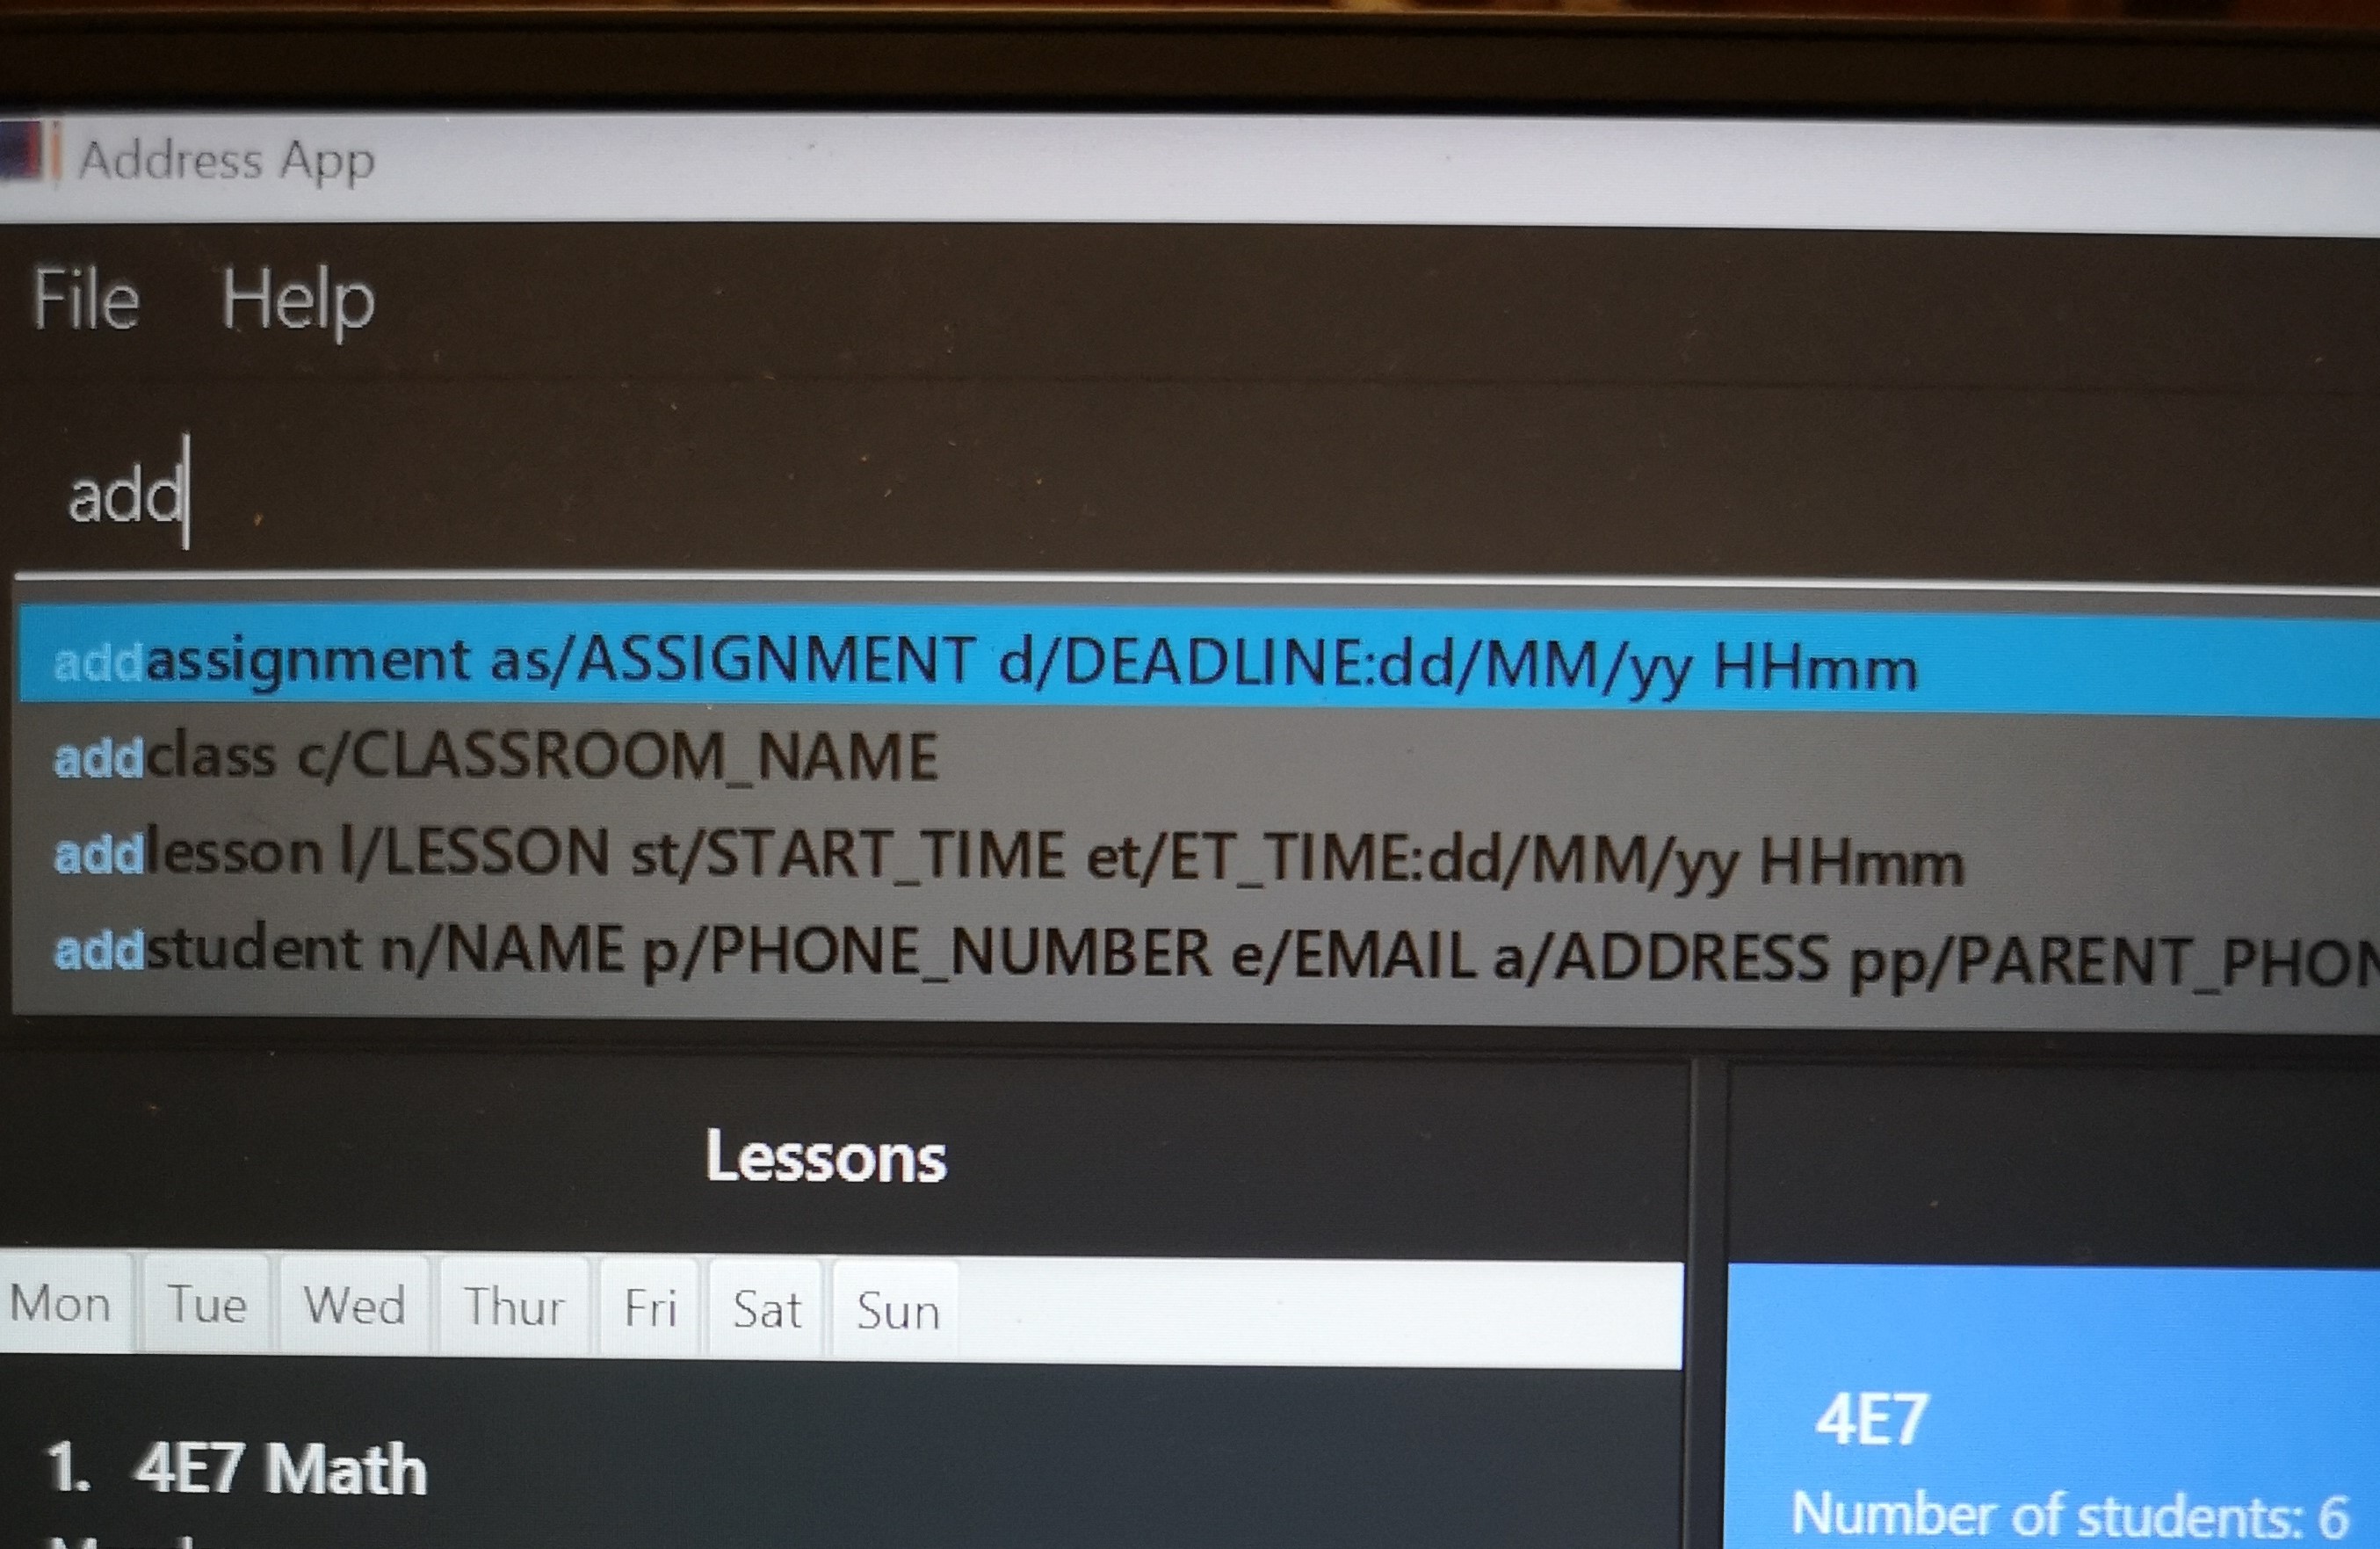
Selecting any of these suggestions results sets the text of the text field to the suggestion.
Usage:
SHIFT + Arrow DOWN and SHIFT + Arrow UP Keys to toggle between autocomplete suggestions
CTRL Key to choose the first autocomplete suggestion, or turn AutoComplete on if it is turned off.
ESC Key to close the autocomplete suggestions and turn off AutoComplete.
| To facilitate the user learning the long and possibly tedious commands, the AutoComplete popup menu does not hide when a user’s input greater than 6 characters does not match any command. This is why even if the input matches the suggestion, the matching part of the suggestion is not highlighted past 6 characters. 6 characters is an arbitrary value and will be improved upon in future releases, and with user feedback. |
History
Allows a user to toggle through their previously entered commands, regardless of whether the command was successful.
It is likely that autocomplete and history will clash, as both use the arrow keys.
We recommend that you turn the autocomplete feature off (ESC key) before using the
history feature.
|
Usage:
Arrow UP and DOWN Key to toggle through previous commands
Undo/Redo: Undo/Redo
Restores the database to the state before the previous undoable command was executed.
Undoable commands are commands that modify the database’s content: add, delete
edit, clear, upload.
|
Undo/redo cannot, however, undo actions made during previous activation of Teacher’s Notebook.
This is to say, once the application is closed, all actions done cannot be undone.
Format: undo or redo
Examples:
-
deletestudent 1+undo(reverses thedelete 1command)
redo(applies the delete command again) -
liststudents+undo(Error message displayed as no changes made to database)
Clear
Clears all data from the notebook. If triggered erroneously, the undo command can be used to reclaim all data.
Format: clear
Classrooms
The user can view his or her classrooms in the middle panel of the GUI of Teacher’s Notebook as shown below.
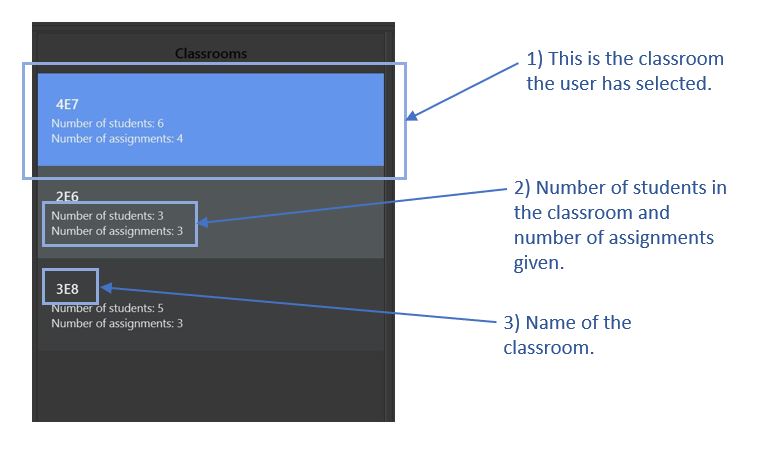
The first classroom in the panel is selected by default.
| Classroom names are case sensitive. |
Adding Classroom: addclass
Adds a new classroom to the list of existing classroom.
Format: addclass c/CLASS_NAME
Examples:
-
addclass c/4E7 -
addclass c/3E8
| The name of the new classroom must not be empty, and it must be different from all current classroom names. |
Deleting Classroom: deleteclass
Allows a user to delete the selected classroom.
Format: deleteclass c/CLASS_NAME
Examples:
-
deleteclass c/4E7 -
deleteclass c/3E8
| Classroom must be in the current list of classrooms, and CLASS_NAME cannot be empty. |
Setting Classroom: setclass
Allows a user to select a classroom as the selected classroom. Student and Assignment functions will act on the selected classroom. The image below illustrates the change in the middle GUI panel when setclass is called.
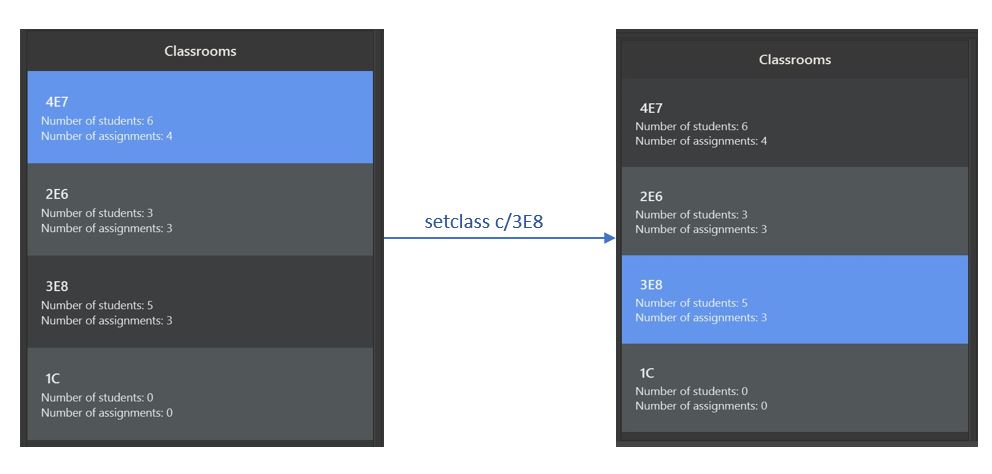
Format: setclass c/CLASS_NAME
Examples:
-
setclass c/4E7 -
setclass c/3E8
| Classroom must be in the current list of classrooms, and classroom name cannot be empty. |
Contributions to the Developer Guide
Given below are sections I contributed to the Developer Guide. They showcase my ability to write technical documentation and the technical depth of my contributions to the project. |
Autocomplete feature
Current Implementation
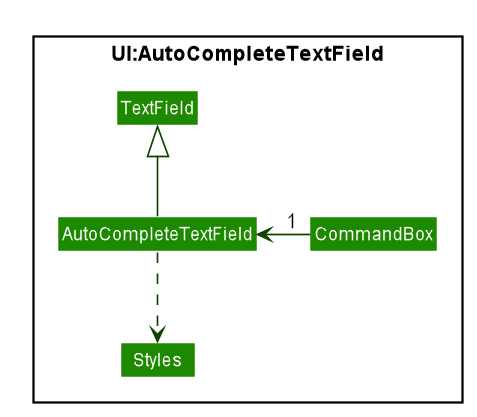
The AutoComplete feature is facilitated by 2 classes: the AutoCompleteTextField, and the class Styles.
Both are represented in the class diagram below.
The AutoCompleteTextField adds a ChangeListener to textProperty() that notifies AutoCompleteTextField
whenever the user inputs new text, i.e when the text entered changes.
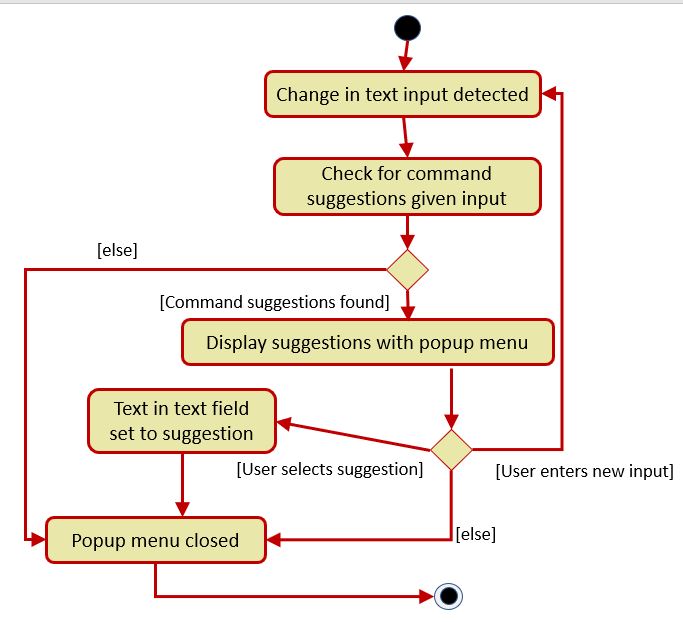
Step 1. User triggers the listener when user enters text.
Step 2. From the text entered, AutoCompleteTextField attempts suggesting existing commands.
If input matches any existing commands, it proceeds to step 3. Otherwise, it does nothing and waits for user input.
Step 3. AutoCompleteTextField calls `Styles#buildTextFlow`to highlight the portion of each
command suggestion where the user’s input matches the suggestion.
Step 4. AutoCompleteTextField then displays a popup menu using the javafx class ContextMenu.
Step 5. If the user selects a suggestion, the textfield is set to that suggestion, and the popup menu is
closed. If the user enters more text, AutoCompleteTextField returns to step 1.
Step 6. Otherwise, the popup menu is closed.
This sequence of steps is illustrated below with an activity diagram.
Upload feature
Current Implementation
The uploading of a student’s picture is facilitated by UploadPictureCommandParser, UploadPictureCommand, ModelManager, FileChooser and DisplayPicture,
while the displaying of the student’s picture is facilitated by MainWindow and StudentCard.
UploadPictureCommandParser implements Parser. UploadPictureCommand extends Command,
and represents the logic that will be executed once the user activates the upload command and chooses a file.
The UploadPictureCommand command communicates with ModelManager to replace the old Student object with
a new Student object that has its display picture field changed.
This change is then reflected in the UI when MainWindow loads the StudentCard for the new student,
which will load the image and display it in the UI.
The main operation implemented is UploadPictureCommand#execute.
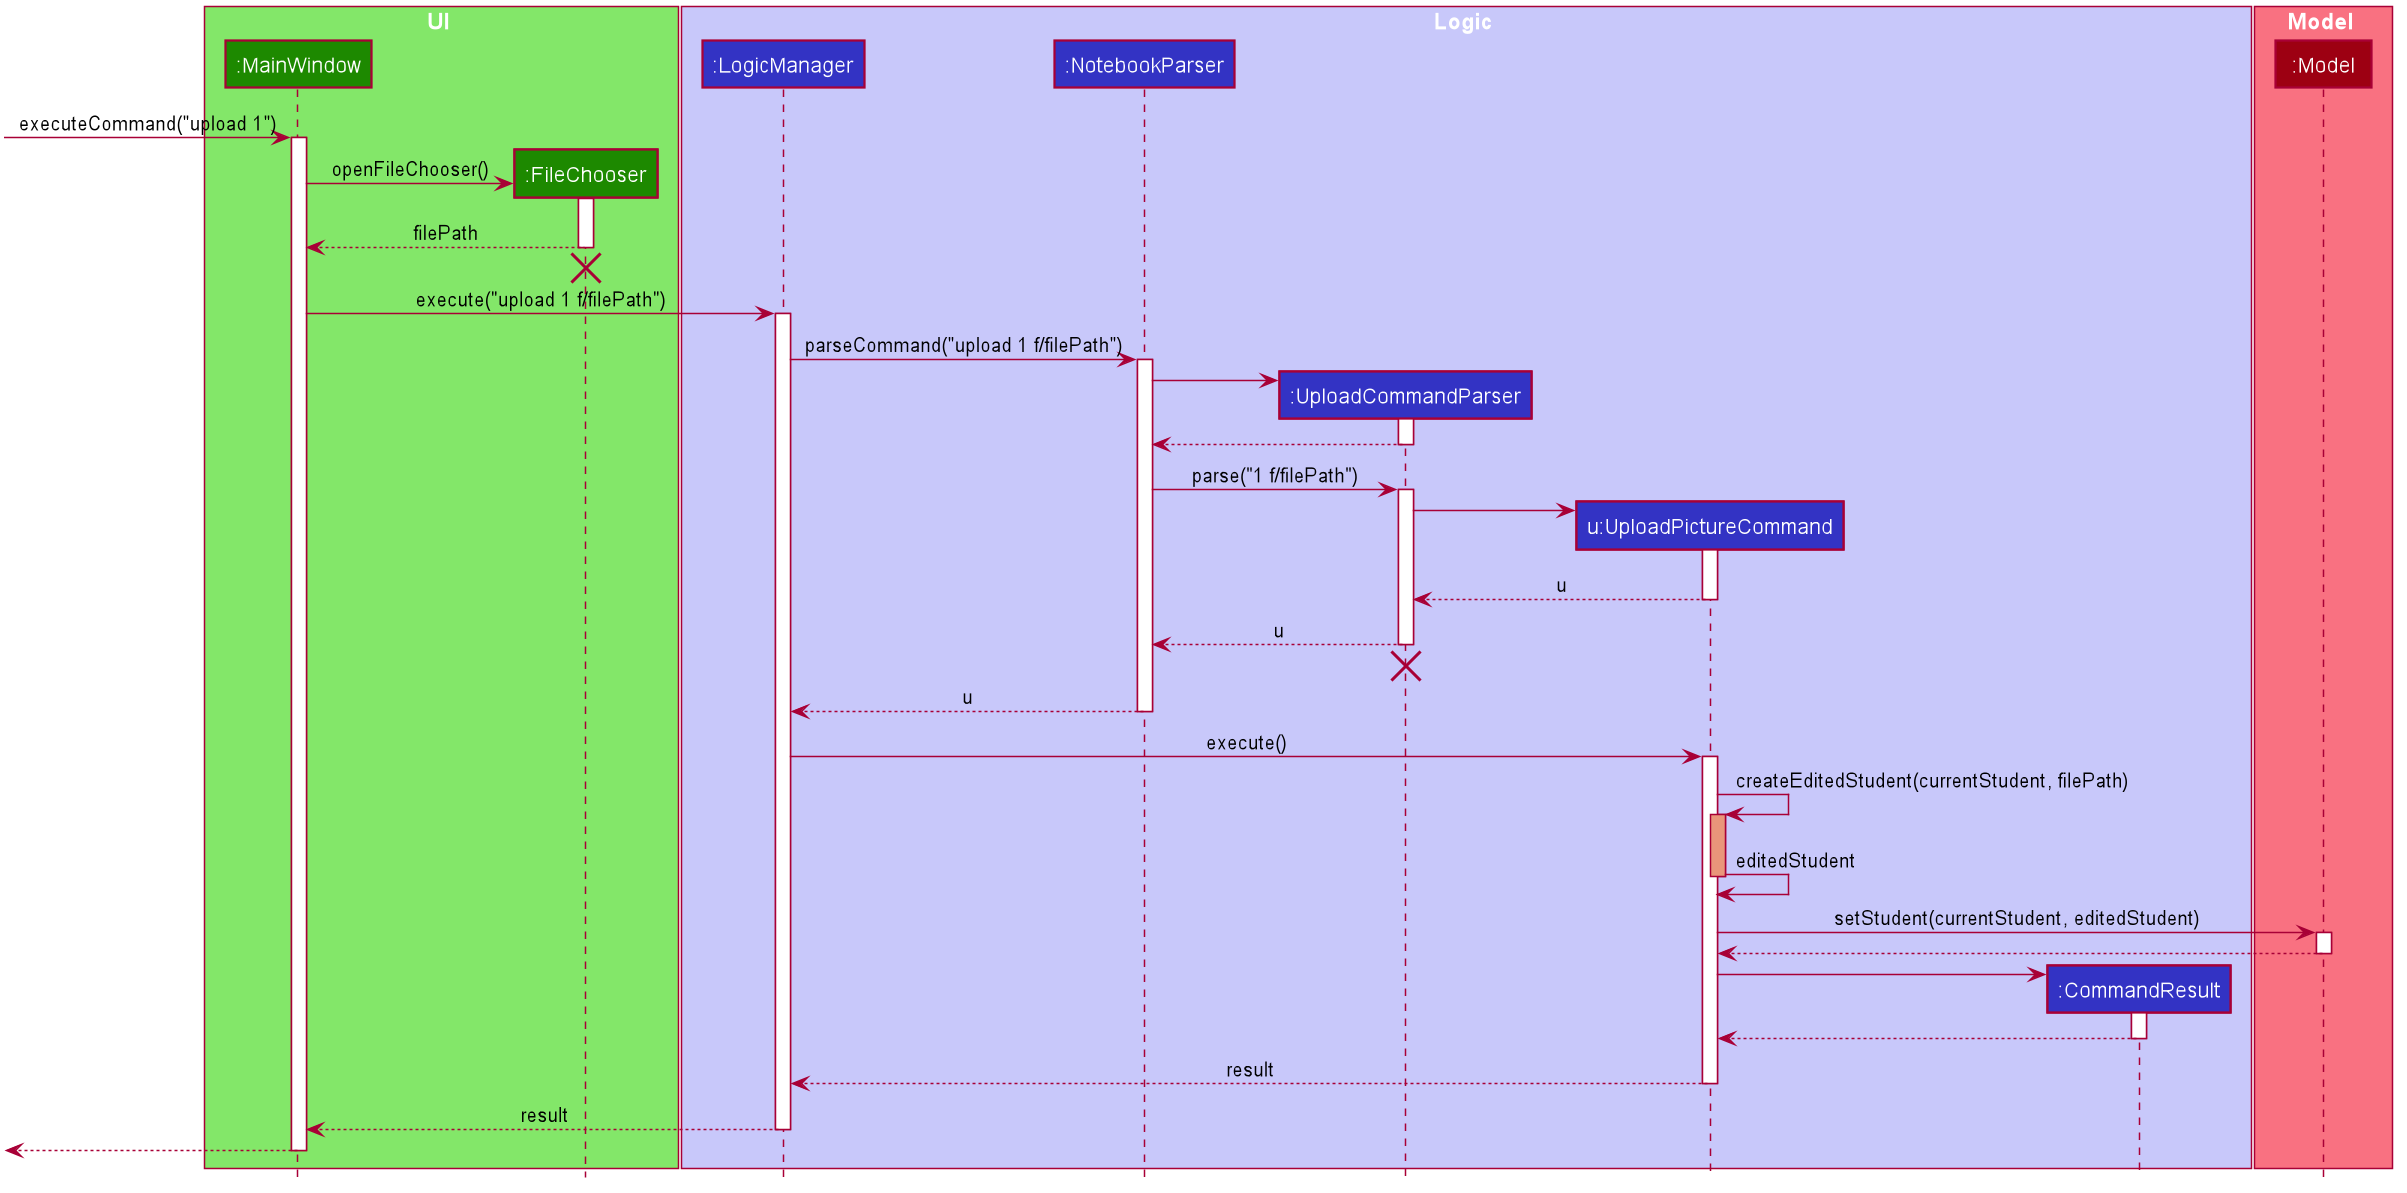
Step 1. The user wants to upload a display picture for their student. User identifies the student’s index
number and enters the command upload INDEX.
Step 2. MainWindow detects the upload command word and uses FileChooser to open a window for the user to select a picture from their computer.
MainWindow then saves the path of the selected file as a string and adds a prefix "f/" to the input arguments.
The path of the file is also appended to the end of the input string before the input arguments are passed to NotebookParser
Step 3. NotebookParser parses the input and detects the upload command word, and calls UploadPictureCommandParser.
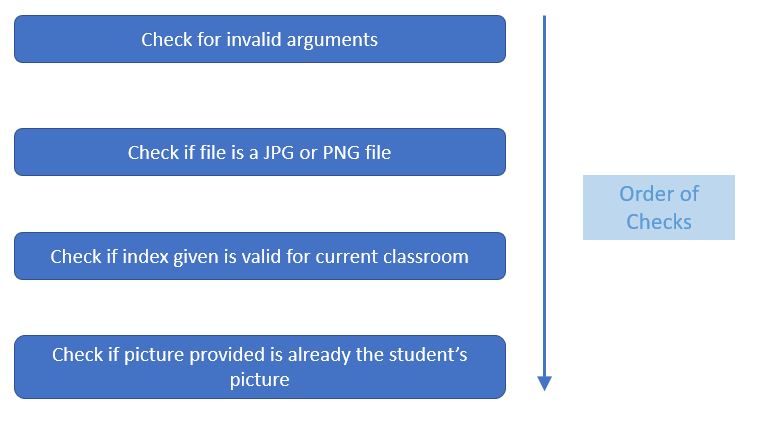
This in turn checks user’s input for errors before calling UploadPictureCommand, which checks whether the file
is a PNG or JPG file.
Step 4. LogicManager executes the UploadPictureCommand, which checks the validity of the index provided,
as well as whether the picture selected is different from the picture already displayed.
A visual representation of the order of checks for the input arguments are displayed in the diagram below.
Step 5. After these checks, the createEditedStudent method in UploadPictureCommand is called to create a new Student object, editedStudent,
which has its display filepath changed to the file the user chose.
Step 6. UploadPictureCommand calls Model to replace the current student with the editedStudent.
The command result is then passed back all the way to MainWindow which refreshes the GUI,
and displays the new picture for the chosen student.
The following diagram illustrates the process above.
